
Easy Sourdough Discard Focaccia Recipe
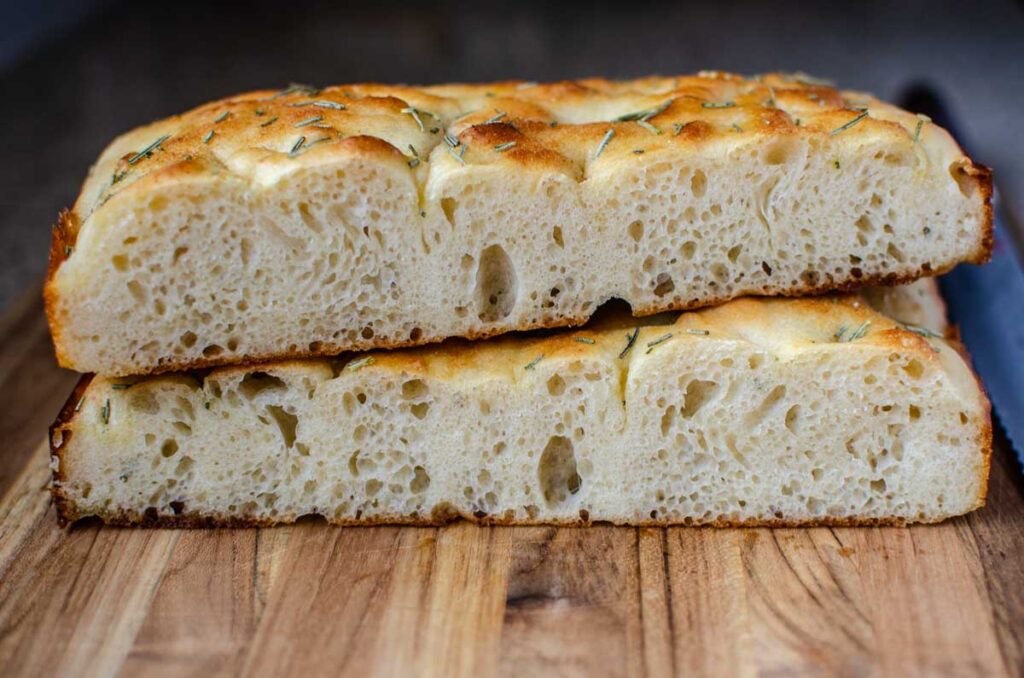
Quick and easy sourdough discard focaccia bread recipe makes a thin, Italian bread that’s light and airy with a lightly crispy crust. Made with sourdough discard, this high-hydration dough produces focaccia with a chewy crumb and a soft and pillowy middle. It makes for an easy appetizer, side dish, or over-the-top sandwiches.
Save This For Later!
We’ll email this post to you so it doesn’t get lost in your open tabs!
By submitting this form, you consent to receive emails from Lockrem Homestead
Sourdough Discard
Sourdough discard is a by-product of your sourdough starter, so don’t throw it away! Instead, use it in delicious Sourdough Discard Recipes where it adds moisture and amazing sourdough flavor. I use 100% hydration sourdough discard in discard recipes.
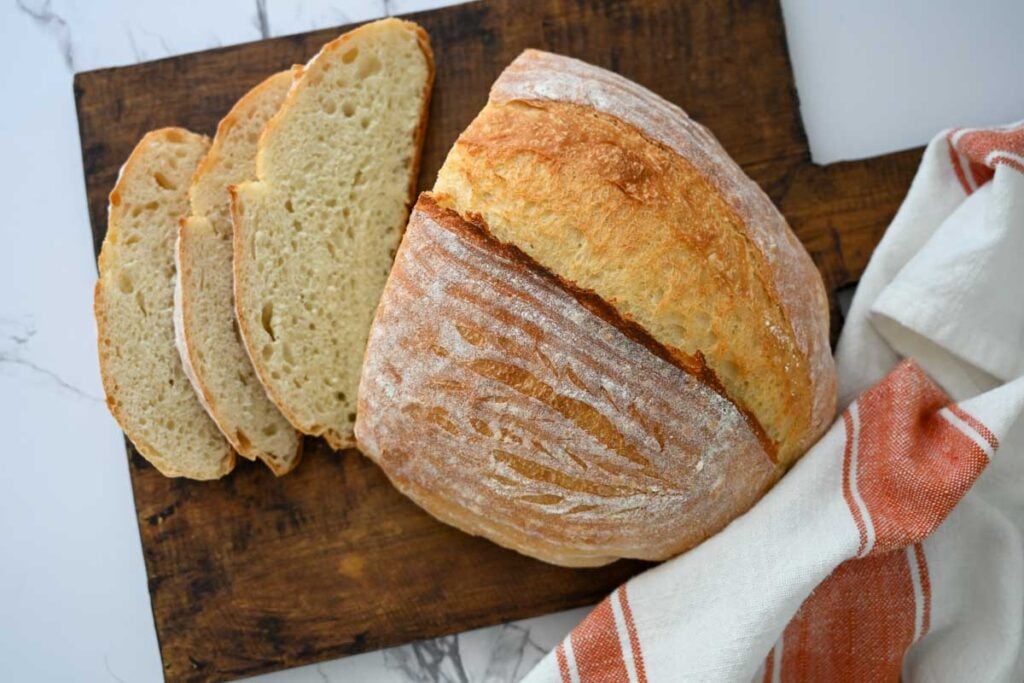
Use older, more tangy discard in savory recipes like Easy Sourdough Discard Bread and younger, fresh discard in sweeter recipes like these Brown Butter Chocolate Chip Cookies.
This sourdough discard focaccia bread boasts the same great flavor of sourdough focaccia, but with made in a fraction of the time. While I always love sourdough focaccia with its long ferment, sometimes I find myself short on time and need a quick and easy recipe.
Why You’ll Love Sourdough Discard Focaccia Bread
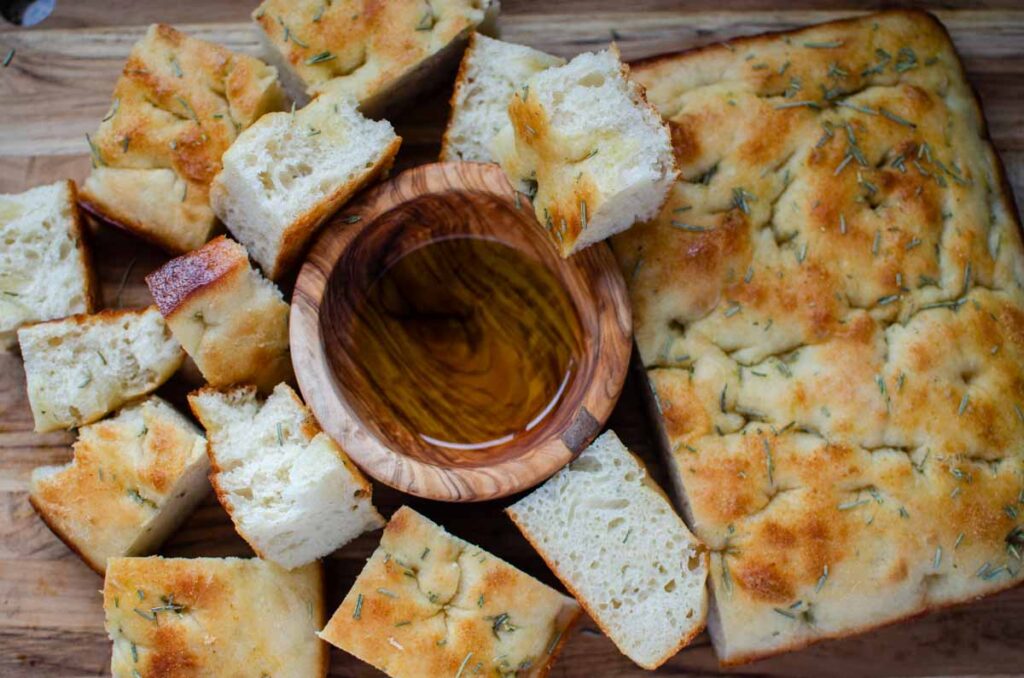
- Feeds a crowd – Serve with dipping oil or sun dried tomato pesto for an easy appetizer for any gathering. Focaccia also makes a great side. Pair it with a bowl of soup or pasta for a cozy, delicious meal. Everyone will gladly reach for a second piece!
- Easy – This is a great, easy way to use sourdough discard. It’s made using pantry ingredients so you can make anytime.
- Delicious – You’ll love how this recipe produces focaccia with a crispy exterior and a light and airy middle.
- Versatile – This recipe is a great canvas to add your favorite toppings and flavors.
- Quick – Discard focaccia gets its lifting power from commercial yeast, so your focaccia bread takes a fraction of the time compared to traditional sourdough focaccia bread.
What’s the Difference Between Active Sourdough Starter and Sourdough Discard?
Traditional sourdough breads rely on an active sourdough starter and a long fermentation for their rise. As the bacteria consume the starches, it releases carbon dioxide. This gas gets trapped in the dough and creates the beautiful air pockets that sourdough bread is known for.
In contrast, sourdough discard is a portion of the starter that’s removed, or discarded, before feeding the starter. Rather than throwing it away, I use it in various sourdough discard recipes to add flavor, texture, and moisture. Try my sourdough discard pancakes, sourdough discard brownies, or sourdough cinnamon sugar quick bread.
Most sourdough discard recipes require an additional leavening agent, such as commercial yeast in easy sourdough discard bread, baking powder in lemon poppy seed scones, or baking soda in sourdough soda bread.
Helpful Tips for Discard Focaccia
- Use bread flour. I use King Arthur’s Bread Flour with a protein level of 12.7%. Read more about the difference between bread flour and all-purpose flour and when to use them.
- Sourdough discard continues to become more acidic (sour) the longer it sits. For the best flavor, I recommend using discard that’s between 1 and 2 weeks old.
- Be sure to line the pan with parchment paper for easy removal.
- Don’t skimp on the olive oil! It’s what gives the focaccia its signature crisp crust.
- Letting the dry active yeast bloom before adding it to the dough lets you know it’s still good.
Discard Focaccia Bread Ingredients
- Yeast – Use active dry yeast mixed with a bit of warm water and honey. You know it’s ready when it shows signs of life, is full of bubbles, and smells similar to beer.
- Warm water – Warm water helps to activate the yeast. Be sure it’s not hot or you run the risk of killing the yeast.
- Honey – Acts as a bit of food for the yeast. You can also substitute granulated sugar.
- Sourdough starter – While you can use an active sourdough starter, this recipe is intended as a way to use sourdough starter discard, relying on the yeast to give the focaccia its lift.
- Olive oil – Use a good quality olive oil, like extra virgin olive oil, for the best flavor.
- Sea salt – Flavors the bread and helps strengthen the gluten.
- Flour – Bread flour provides extra strength for a chewy texture and airy rise compared to all-purpose flour. While you can use all-purpose flour, its lower protein content will produce a smaller rise.
- Garlic powder – While optional, it does add delicious flavor to your focaccia bread.
- Rosemary – Fresh rosemary is the preferred option if you have access to it, however, dried rosemary works too.
Equipment For Homemade Focaccia Bread
- Kitchen scale – A vital tool for measuring sourdough bread dough ingredients. They’re not expensive and will help ensure accurate, consistent measurements.
- 9 x 13 baking pan
- Stand mixer – Makes mixing the dough and incorporating the butter effortless
- Bench scraper
- Digital thermometer – Use to read the bread’s internal temperature to know when the bread is done baking. Great for beginner bakers as they improve their bread-baking skills.
- Cooling rack
How to Make Discard Focaccia Bread
Mix the Dough Using A Stand Mixer
Add (1 tbsp) honey, (350 g) warm water, and (2 ¼ tsp) active yeast to a small bowl. Let rest for 5 minutes at room temperature.
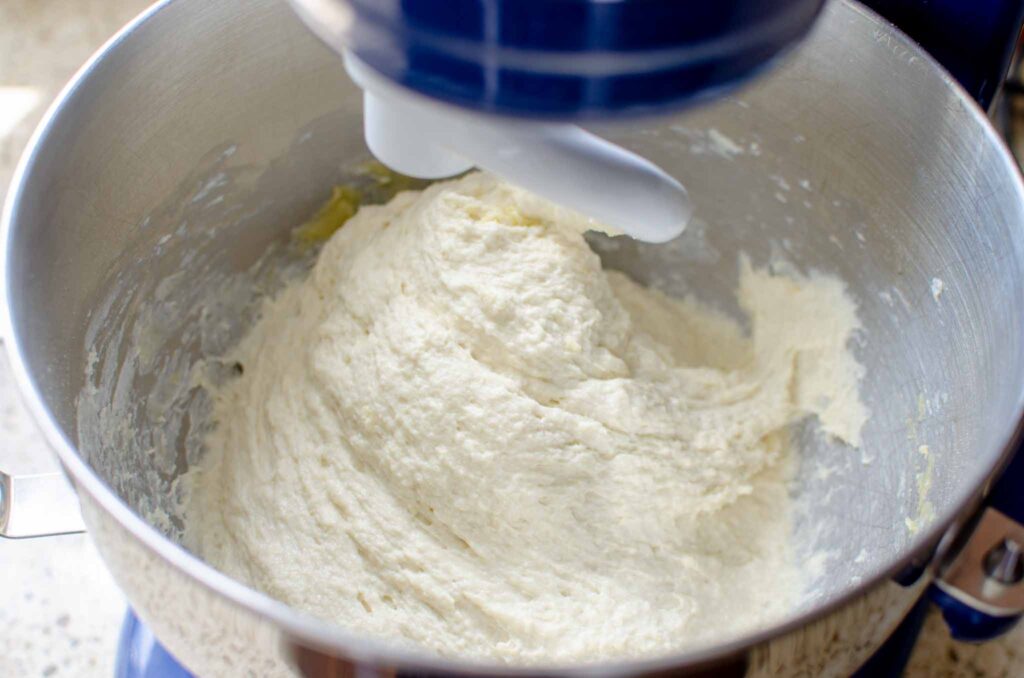
Add (250 g) sourdough starter discard, (1 tbsp) olive oil, (1 tbsp) salt, and the yeast mixture to the bowl of a stand mixer fitted with the dough hook attachment. Mix on low speed for a few seconds to mix the ingredients.
Then add (500 g) bread flour and mix on low speed (speed 2 on kitchen aid mixer) for 5 minutes. Scrape down the sides of the bowl as needed. At this point, the dough will be shaggy and break when stretched.
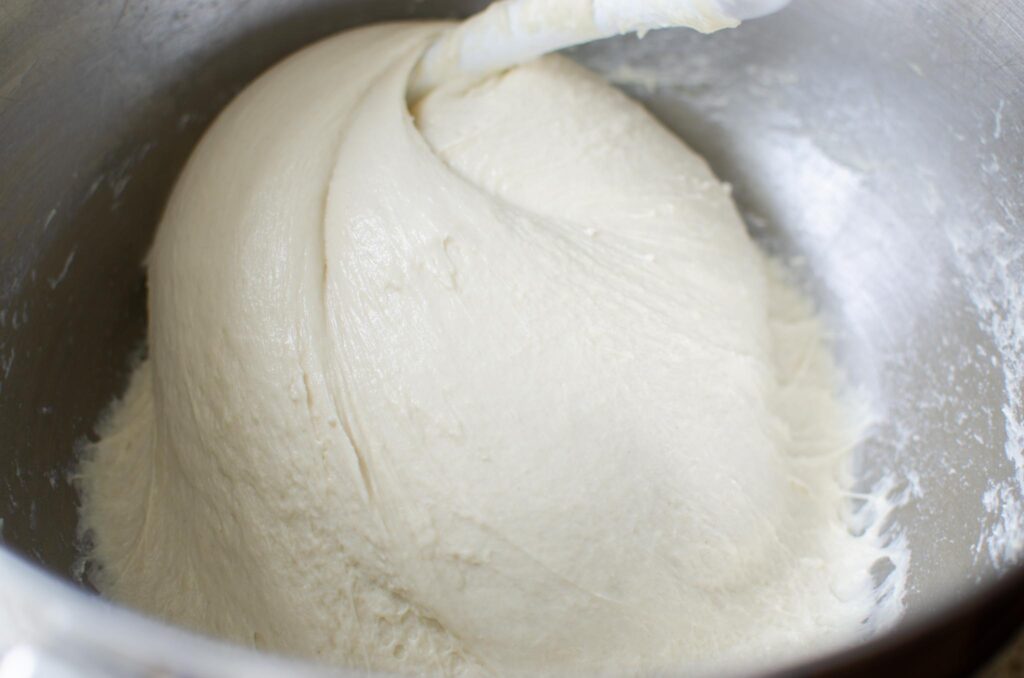
Cover the bowl with a towel and let rest for 15 minutes at room temperature. This allows time for the flour to fully hydrate. Remove the towel and mix again on low speed for 8-10 minutes. You’ll notice the dough becomes smoother and more elastic.

Mix the Dough By Hand
Alternatively, you can easily mix the dough by hand.
Add the dough ingredients to a large bowl and combine with a dough whisk. Cover the bowl with a towel and rest for 15 minutes at room temperature.
Next, do a series of stretches and folds. Grab the edge of the dough and lift it straight up, then fold it over onto itself in the middle of the bowl. Rotate the bowl 90 degrees, and repeat with another stretch. Continue stretching and folding the dough, rotating the bowl, for 15-20 stretches. You may feel the dough become more resistant as you fold, however, since it’s a high-hydration dough it may continue to feel loose, which is normal.
Cover the bowl and rest for 15 minutes. This completes one set of stretches and folds. Continue stretching and folding, with a total of 4 sets of stretch and folds.
The First Rise – Bulk Fermentation
Cover the bowl and let the dough rise for 1-2 hours in a warm spot, or until the dough has doubled.
Second Rise – Proofing
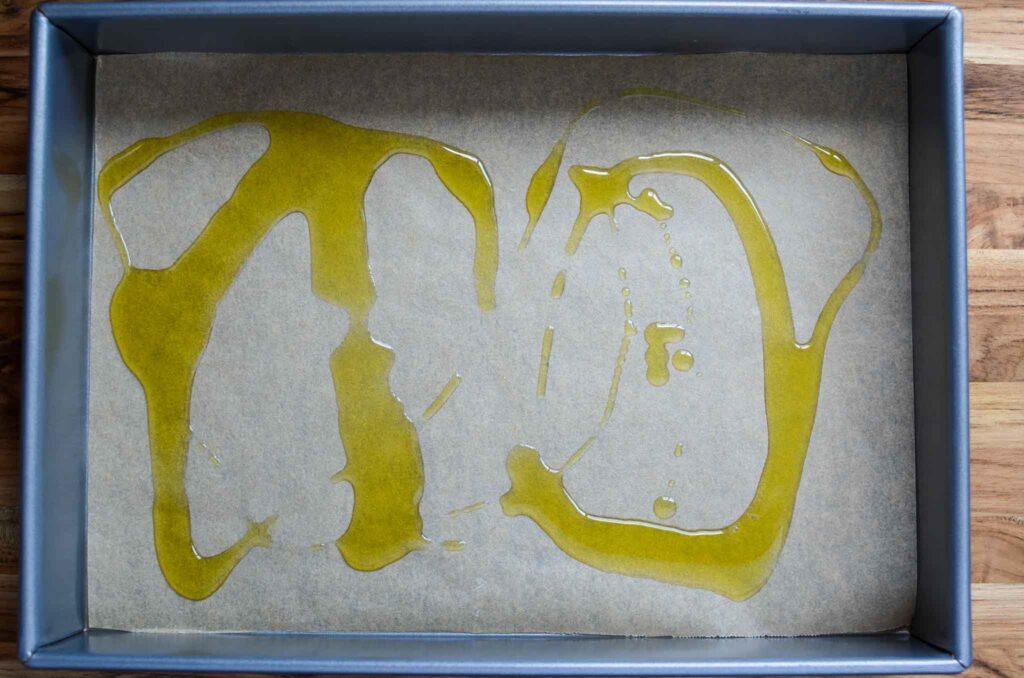
Line the bottom of the pan with a piece of parchment paper.
Then, drizzle 2 tbsp pf olive oil over the parchment paper and place the dough in the pan. Stretch the dough to fit the size of the baking pan. Wet your hands with a bit of water to prevent sticking.
Cover the pan and let the dough rest for its second rise, 1-2 hours. You can use a piece of plastic wrap, but I like to use a large cutting board to cut down on using more product.
Dimple and Bake
Preheat the oven to 450º F (232º C).
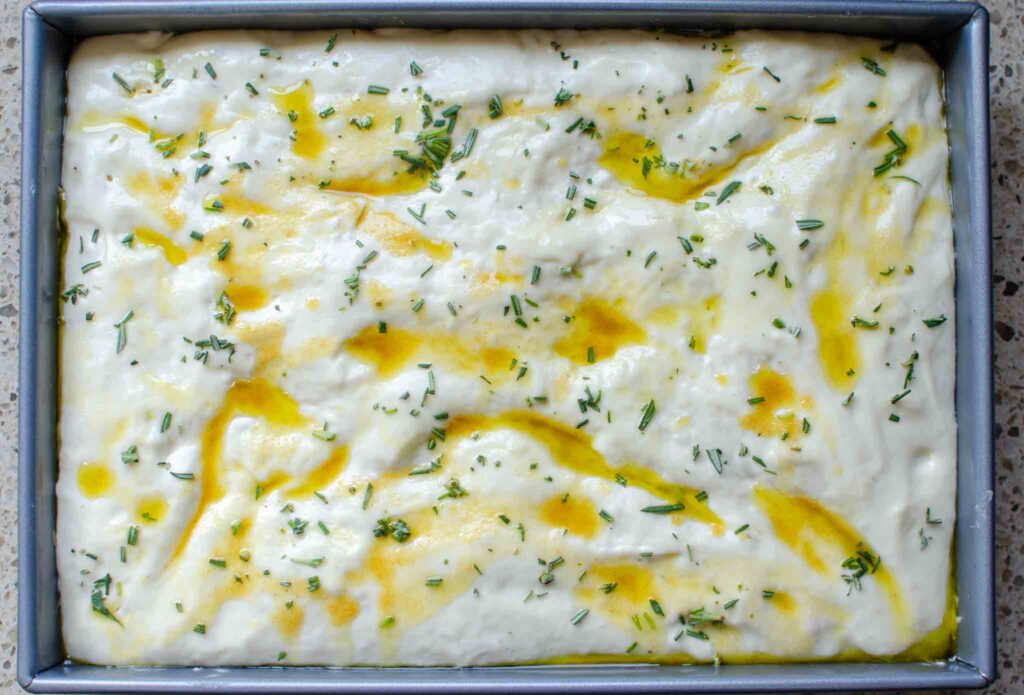
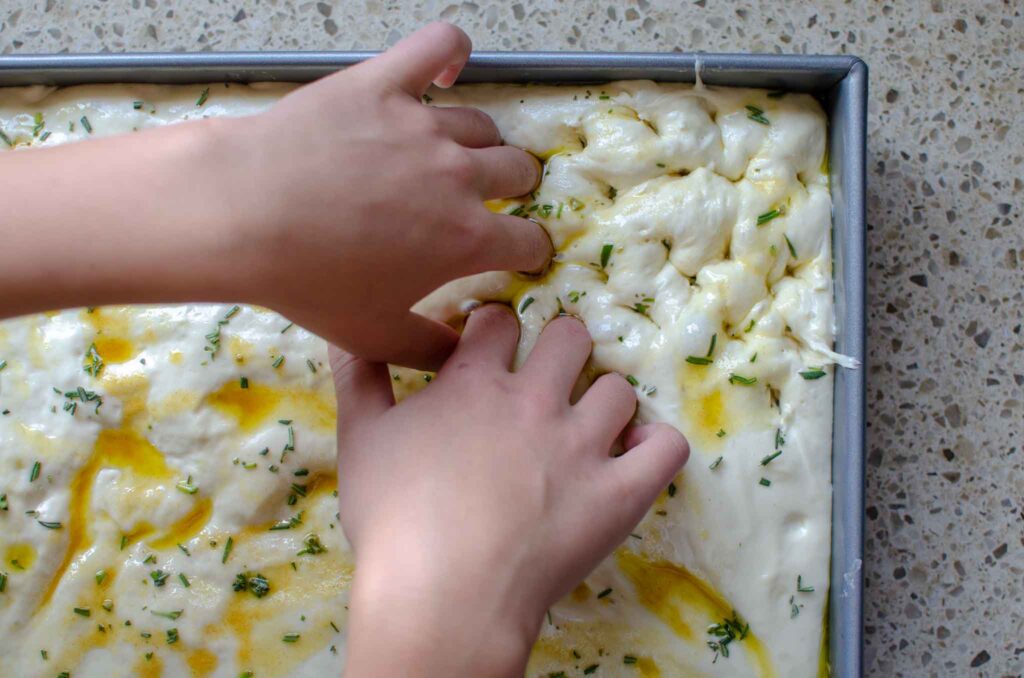
Using oil-covered fingers, press straight down into the top of the dough, creating dimples in the dough. Continue dimpling the dough across the entire pan.
Drizzle 2 tbsp of olive oil over the top of the dimpled focaccia dough. Sprinkle with the garlic powder and the rosemary.
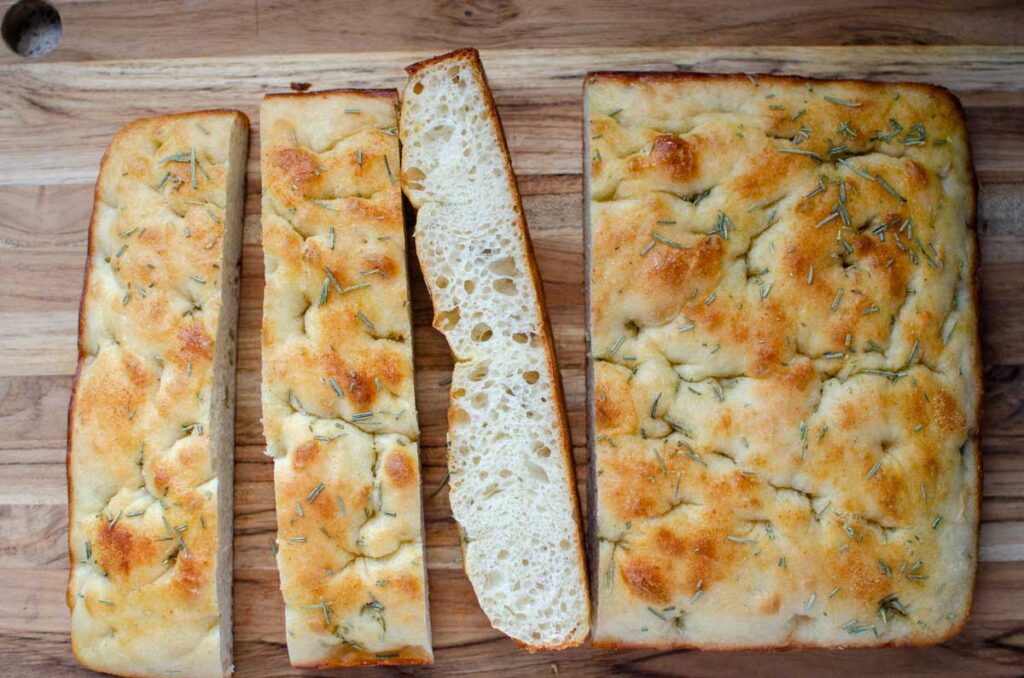
Bake for 20-22 minutes, or until the top of the focaccia bread is golden brown and the internal temperature reads 200ºF (93ºC) with an instant-read thermometer.
Remove the bread from the pan and place onto a wire rack to cool.
Store
Allow the bread to cool completely before placing leftover focaccia bread in an airtight container. Store at room temperature for 3 days.
Sourdough Discard Focaccia Sample Schedule
| Day 1: 8:00 am | Activate the yeast |
| 8:05 am | Mix the dough and rest |
| 8:25 am | Second mix |
| 8:35 am | First rise |
| 10:35 am | Place the dough in the pan |
| 10:40 am | Proof |
| 12:40 pm | Dimple the dough and preheat oven |
| 12:45 pm | Bake the focaccia bread |
FAQs About Discard Sourdough Focaccia
How Can I Add More Sourdough Tangy Flavor?
During the focaccia’s first rise, cover the dough and place it into the refrigerator to rise overnight. This cold, long ferment slows the yeast activity, giving the sourdough time to develop a tangier flavor.
The next morning, place the dough into the prepared pan and allow it to rise before dimpling. Continue with the directions as stated. Note, however, that the second rise time will be longer than the directions since the dough is cold, so plan accordingly.
Can I Use Instant Yeast?
Yes, using instant yeast will save you a few minutes of time since you don’t need to wait for the yeast to activate. Sprinkle the instant yeast into the water without waiting for the yeast to activate and continue with the directions.
Can I Use Active Sourdough Starter Instead of Discard in This Sourdough Discard Focaccia Recipe?
Yes, you can use active sourdough starter for this simple sourdough bread recipe. Swap an equal amount of active starter by weight for the discard. Keep an eye on the dough, as active starter can speed up the process. If you’re new to using active sourdough starter, check out the Complete Sourdough Starter Guide.
What Size Pan Should I Use?
- 9″ x 13″ baking pan – Creates a thicker focaccia bread with crispy edges and fluffy, soft interior.
- 2 8″X8″ square pans – Makes 2 pans of thicker focaccia breads. Ideal for when you want a variety of toppings.
- Half sheet pan (18″ x 13″) – Produces a thinner focaccia with more crispy edges, perfect for making sandwiches. This is great when you have a large crowd to feed. Bake, checking the bread after 15 minutes.
What Type of Toppings Can I Add to Sourdough Discard Focaccia Bread?
Dress up your focaccia bread with your favorite toppings. Experiment using olives, cheese, tomatoes, or fresh herbs.
How Do I Serve Sourdough Discard Focaccia Bread?
- Sourdough discard focaccia is delicious with a salad or bowl of soup.
- Slice a piece of focaccia horizontally and stuff with your favorite deli meats and cheeses to create savory sandwiches.
- Pair focaccia with soft cheeses, like whipped feta, baked brie, or queso.
- Cut small pieces and add them to a charcuterie board.
- Enjoy with a variety of dips like olive oil and balsamic vinegar, spinach artichoke dip, or hummus.
Do I Need to Use a Kitchen Scale?
I know that buying a kitchen scale seems like one more thing, however, measuring by weight instead of volume ensures consistent sourdough bread doughs. Investing in an inexpensive scale is a great idea if you plan to bake sourdough bread regularly.
I’d love to hear from you! If you made this Easy Sourdough Discard Focaccia Bread recipe and loved it, I would love it if you gave it 5 stars! Happy Baking!

Quick and Easy Sourdough Discard Focaccia Bread
Want to Save This Recipe?
Enter your email & I’ll send it to your inbox. Plus, get great new recipes from me every week!
By submitting this form, you consent to receive emails from Lockrem Homestead
Ingredients
Focaccia Dough Ingredients
- 2 ¼ tsp dry active yeast
- 350 g warm water 1½ cups
- 1 tbsp honey
- 1 tbsp salt
- 1 tbsp olive oil
- 250 g sourdough discard 1 cup
- 500 g bread flour 4 cups
Topping Ingredients
- ¼ cup olive oil, divided
- 1 tsp garlic powder
- 2 sprigs fresh rosemary
Instructions
Mix the Dough – Using a Stand Mixer
- Add (1 tbsp) honey, (350 g) warm water, and (2 ¼ tsp) active yeast to a small bowl. Let rest for 5 minutes at room temperature.
- Add (250 g) sourdough starter discard, (1 tbsp) olive oil, (1 tbsp) salt, and the yeast mixture to the bowl of a stand mixer fitted with the dough hook attachment. Mix on low speed for a few seconds to mix the ingredients. Then add (500 g) bread flour and mix on low speed (speed 2 on kitchen aid mixer) for 5 minutes. Scrape down the sides of the bowl as needed. At this point, the dough will be shaggy and break when stretched.
- Cover the bowl with a towel and let rest for 15 minutes at room temperature. This allows time for the flour to fully hydrate. Remove the towel and mix again on low speed for 8-10 minutes. You'll notice the dough becomes smoother and more elastic.
Mixing the Dough – By Hand
- Alternatively, you can easily mix the dough by hand. Add the dough ingredients to a large bowl and combine with a dough whisk. Cover the bowl with a towel and rest for 15 minutes at room temperature.
- Next, do a series of stretches and folds. Grab the edge of the dough and lift it straight up, then fold it over onto itself in the middle of the bowl. Rotate the bowl 90 degrees, and repeat with another stretch. Continue stretching and folding the dough, rotating the bowl, for 15-20 stretches. You may feel the dough become more resistant as you fold, however, since it's a high-hydration dough it may continue to feel loose, which is normal.
- Cover the bowl and rest for 15 minutes. This completes one set of stretches and folds. Continue stretching and folding, with a total of 4 sets of stretch and folds.
The First Rise – Bulk Fermentation
- Cover the bowl and let the dough rise for 1-2 hours in a warm spot, or until the dough has doubled.
Second Rise – Proofing
- Line the bottom of the pan with a piece of parchment paper. Then, drizzle 2 tbsp pf olive oil over the parchment paper and place the dough in the pan. Stretch the dough to fit the size of the baking pan. Wet your hands with a bit of water to prevent sticking.Cover the pan and let the dough rest for its second rise, 1-2 hours. You can use a piece of plastic wrap, but I like to use a large cutting board to cut down on using more product.
Dimple and Bake
- Preheat the oven to 450º F (232º C).
- Using oil-covered fingers, press straight down into the top of the dough, creating dimples in the dough. Continue dimpling the dough across the entire pan.
- Drizzle 2 tbsp of olive oil over the top of the dimpled focaccia dough. Sprinkle with the garlic powder and the rosemary.
- Bake for 20-22 minutes, or until the top of the focaccia bread is golden brown and the internal temperature reads 200ºF (93ºC) with an instant-read thermometer.
- Remove the bread from the pan and place onto a wire rack to cool.
Store
- Allow the bread to cool completely before placing leftover focaccia bread in an airtight container. Store at room temperature for up to 3 days.
My husband loves to dip his sourdough in olive oil and flaky salt, and this focaccia wraps the whole experience in a bite! Send any questions or comments my way, and enjoy!
why the flavor is good, it’s very wet and my dimples don’t stand. should I add more bread flour?
Focaccia is a wet dough due to the high hydration. If the dimples aren’t holding, it sounds like the gluten hasn’t been developed enough. I suggest doing another set of folds, maybe two, rather than adding more bread flour.