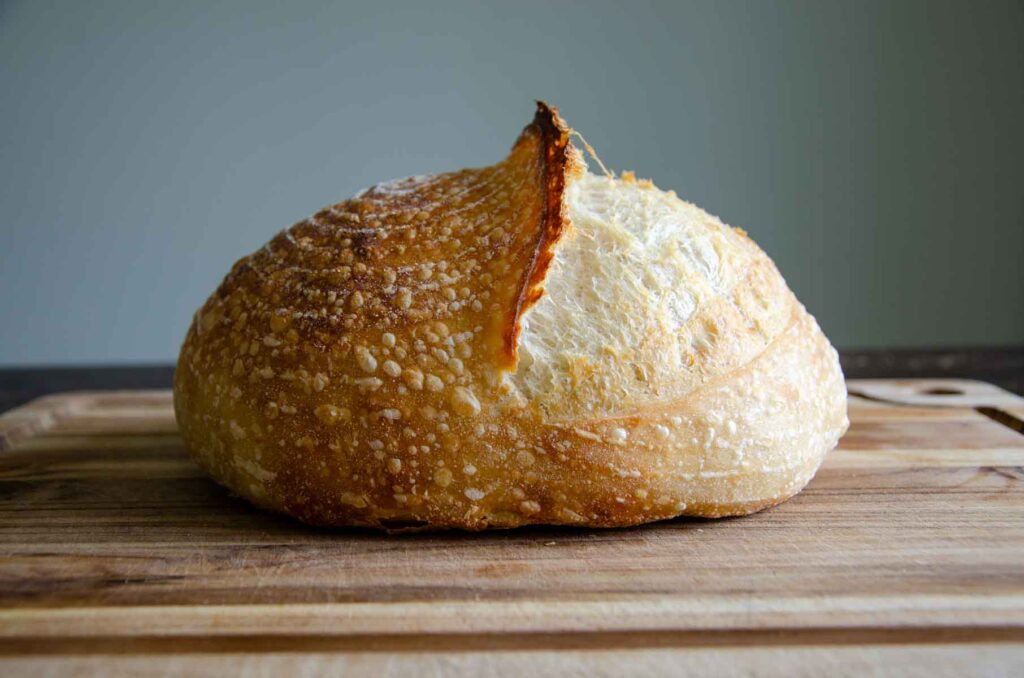
Sourdough Croissant Bread
This sourdough croissant bread recipe combines all the loveliness of a flaky croissant with the simplicity of a sourdough loaf. Sourdough croissant bread has golden, flaky layers of a classic croissant from layers of grated butter folded in the dough before cold proofing.

Save This For Later!
We’ll email this post to you so it doesn’t get lost in your open tabs!
By submitting this form, you consent to receive emails from Lockrem Homestead
New to Sourdough?
If you’re new to sourdough baking, these beginner-friendly guides will help you get started with confidence. Learn how to make a Sourdough Starter from Scratch, feed and maintain it with the Complete Sourdough Starter Guide, and bake your first loaf with this Easy Sourdough Bread Recipe. Together, these guides create a solid foundation for your sourdough journey.
I love it when two worlds collide to create something delicious! Introducing sourdough croissant bread!
Sourdough croissants are a delight with their buttery layers, but require a commitment with their intensive lamination process. If you want the same great buttery flavor without the fuss of traditional croissants, you’ll love this sourdough croissant loaf!
We have a saying in our home that bread is usually a delicious carrier for butter. But good bread doesn’t need it! Lucky for us all, the sourdough croissant bread exists, with all of the buttery goodness a heart could want.
Enjoy this delightful bread and let me know if you love it as much as we do!
Why You’ll Love Croissant Sourdough Bread
- Easy – Get the same buttery flavor of flaky croissants without the fuss of butter block building between the layers of a traditional croissant dough.
- Delicious – With a stick of grated butter folded in the dough, there’s no doubt that this bread is delicious and makes for an extra special treat! Perfect to serve at a special occasion without a lot of fuss.
- Simple Ingredients – With just a few basic ingredients, you can elevate a simple bread into a treat, worthy of any celebration!
Croissant Sourdough Bread Ingredients
 Sourdough – Use an active sourdough starter, meaning it’s been fed recently, is full of bubbles, and has a yeasty scent, to create a levain. Alternatively, use a sourdough starter in place of the levain if you refresh it regularly and it’s healthy.
- Flour – With a higher protein content, bread flour helps build a stronger gluten structure than all-purpose flour.
- Water – The temperature of the dough is important! Use cool water, roughly 75°F/24°C.
- Salt – Adds flavor to the bread and helps with gluten development.
- Butter – Since the saltiness will vary brand to brand, I like to use unsalted butter to have full control over the level of salt for consistent results. Grate the butter with a cheese grater and refrigerate until ready to add to the dough. Using cold butter will give you the best results for flaky layers.
 Sourdough – Use an active sourdough starter, meaning it’s been fed recently, is full of bubbles, and has a yeasty scent, to create a levain. Alternatively, use a sourdough starter in place of the levain if you refresh it regularly and it’s healthy.
Sourdough Croissant Bread Loaf Recipe Equipment
- Bowl
- Kitchen scale – A vital tool for measuring sourdough bread dough ingredients. They’re not expensive and will help ensure accurate, consistent measurements.
- Danish dough whisk – I like how a Danish dough whisk cuts through the dough to incorporate the ingredients. A great tool if you plan to bake sourdough bread regularly.
- Lame – A special scoring tool that holds a sharp razor. You can also use a sharp knife, but a lame makes it easy for small, intricate scoring.
- 9″ Banneton basket – A banneton is a proofing basket that provides support for the bread dough as it proofs. Dust with a little bit of rice flour to prevent the dough from sticking.
- Parchment paper or a dough sling.
- 7 qt Dutch oven or larger – Using a Dutch oven is the best way for home bakers to create an artisan loaf of bread with a beautiful crust. The enclosed baking environment traps steam, allowing the crust to stay moist and expand.
- Digital thermometer – Use to read the bread’s internal temperature to know when the bread is done baking. Great for beginner bakers as they improve their bread-baking skills.
- Cooling rack
How to Make Sourdough Croissant Bread
Create the Levain
1:1:1 Levain: This recipe calls for a levain mixed the night before you mix the dough. Combine 42 g sourdough starter, 42 g water, and 42 g all-purpose flour in a small bowl. Cover and let it sit at room temperature for 4-8 hours.
The levain is ready when it has doubled in size and has lots of bubbles, with a pleasant aroma.
Grate 113 g (½ cup) unsalted butter into a small dish and refrigerate until ready to add to the dough.
Do you have to use a levain in this recipe? No! You can substitute 125 g of active sourdough starter for the levain if your starter is well-maintained and frequently refreshed.
Autolyse
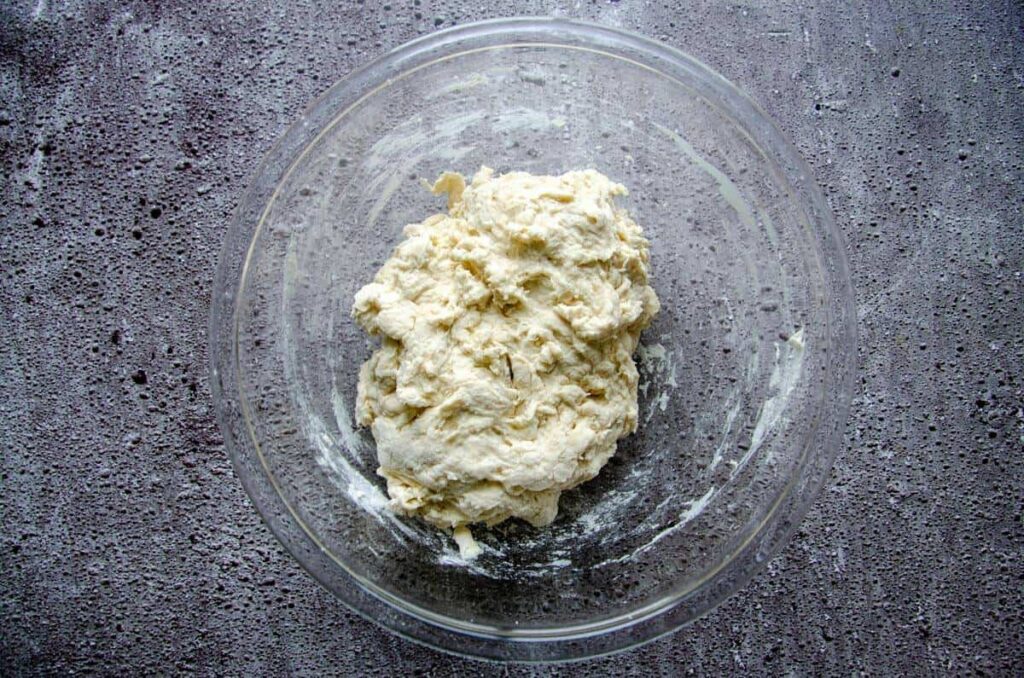
Add 320 g (1⅓ cups) water and 500 g (4 cups) bread flour to a large bowl. Mix until a shaggy dough forms. Be sure all of the flour at the bottom of the dough is worked in. I like to use my hands to work the final bits of flour into the dough.
Cover the bowl and rest for 30 minutes.

Mix the Dough
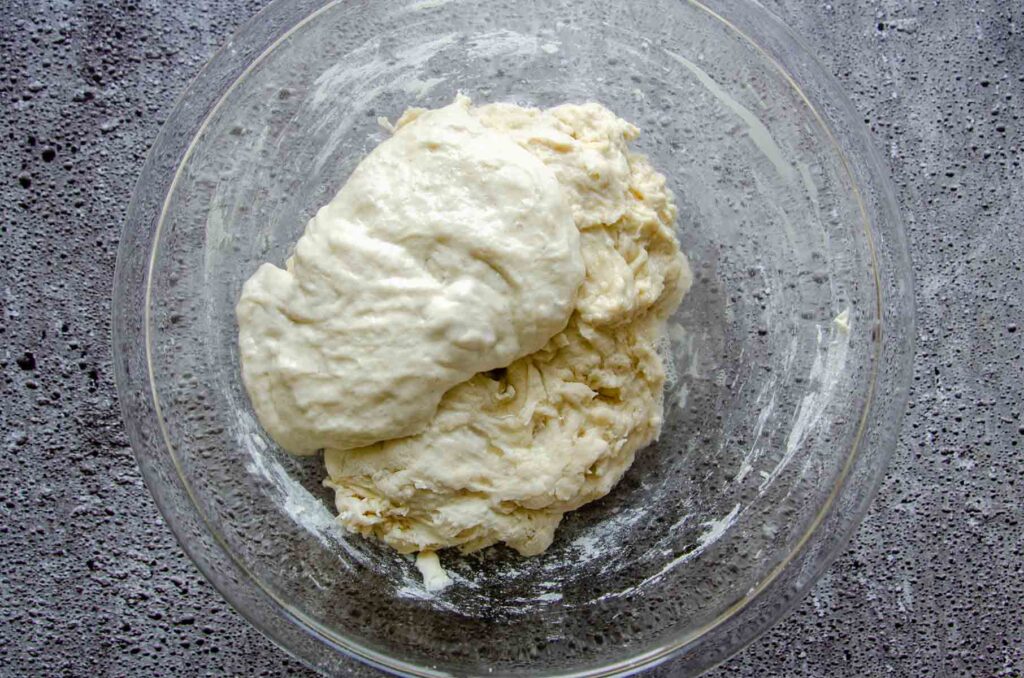
In a small bowl, combine 10 g (2 tsp) salt with the remaining 30 g (2 tbsp) water. Stir to dissolve the salt. Pour the salty water over the dough, in addition to all of the ripe levain.
I find that my hands are the best tool for this job. Use the pincer method to work the levain and salt into the dough. Squeeze the dough between your thumb and fingers, pinching the dough into sections. Rotate the dough, and pinch another section until the levain and liquid are adequately distributed throughout the dough.
At this point, the dough can look a bit stringy and not fully cohesive; this is ok. Cover the bowl and let it rest for 30 minutes.

The exact rise time is largely driven by temperature. A cooler kitchen will slow the yeast activity and increase the rise time compared to a warmer kitchen. This bread recipe is made in a 72°F/22°C kitchen.
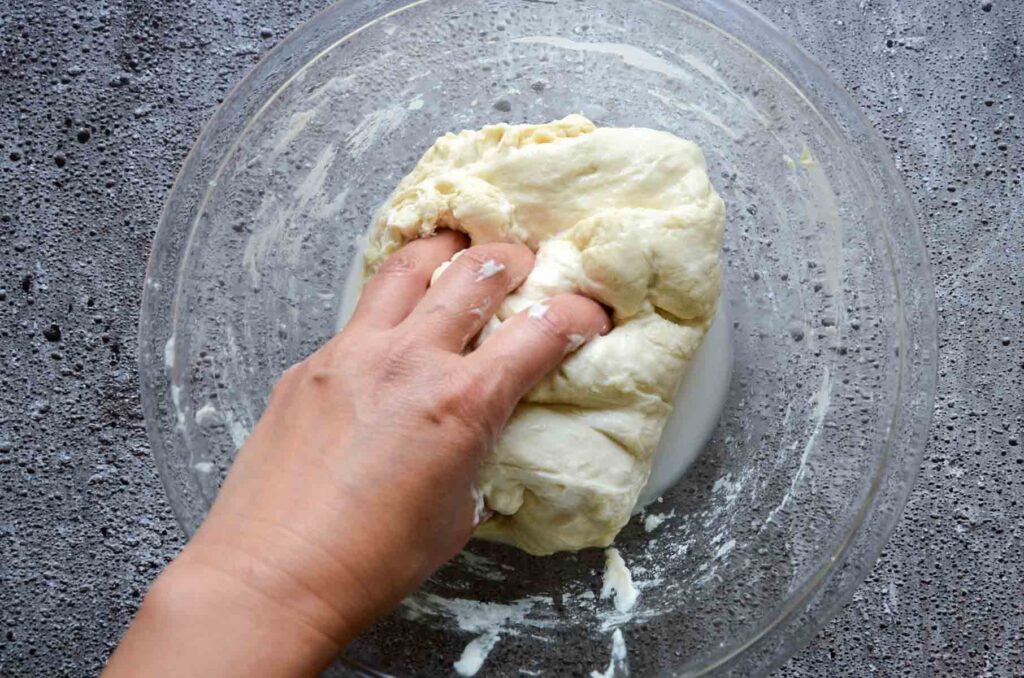
Stretch and Folds | Strengthen the Gluten
Do a series of stretch and fold to build the gluten.
Grab the edge of the dough and lift it straight up before folding it over onto itself.
Turn the bowl a quarter turn, and repeat, working your way around the sides of the bowl. Initially, the dough will be loose, but after 10-15 folds, the dough begins to come together.
Continue to stretch and fold the dough roughly 20-30 times, or until the dough becomes resistant. Cover the bowl and rest for 30 minutes. This completes one set of stretch and folds.
Do a total of 4 sets of stretch and folds over the next 90 minutes. The dough transforms from a rough, shaggy croissant dough to a smooth and elastic dough.


Continue stretching and folding the dough for a total of 4 sets with 30 minute intervals.
On the second set of stretch and folds, add half of the grated butter over the top of the dough. Using the same stretch and fold method, incorporate the butter into the dough. Cover and rest for 30 minutes.


Add the remaining grated butter to the dough on the third set of stretch and folds. Cover and rest for 30 minutes.
By the fourth and final set of stretch and folds, the dough will be elastic and smooth, with the grated butter distributed throughout the dough.


It’s important that the dough maintains a temperature of 70°-72°F/21°-22°C. Similar to making other pastry dough, like rough puff pastry or croissants, it’s important that the layers of butter stay cool to prevent too much butter leakage during the bake time. Take the temperature using a digital thermometer to monitor the dough temp. Place the bowl in the fridge for 10 minutes to cool the dough down if it starts to get too warm.
Bulk Ferment
After the stretch and folds are completed, cover the bowl and let it rest at room temperature.
The dough is done bulk fermenting when you see plenty of air bubbles beneath the surface, the dough has doubled in size, and the edge of the dough where it meets the bowl domes down slightly.


Because the dough is heavier than a traditional sourdough bread dough with the added butter, the total bulk fermentation time may be longer than normal. Keep an eye on the dough’s temperature to make sure the butter doesn’t soften too much. Aim to keep the dough at 70°F/21°C. Place the bowl into the refrigerator to cool the dough temperature as needed.
Preshape
Turn out the dough onto a lightly floured work surface. Using a bench scraper and one hand, rotate the dough while pushing the dough under with the bench scraper, into a boule shape.


Bench Rest
Let the preshaped dough rest on the counter for 30 minutes uncovered. It’s normal for the dough to flatten a bit as it rests. This allows the gluten to relax a bit before its final shaping.
Shape
Prepare your banneton by dusting it with a bit of rice flour to prevent the dough from sticking.
Fold the bottom of the dough up to the middle and gently press it into the dough. Pull the right side of the dough out a bit to stretch it before folding it over the middle of the dough. Repeat with the left side of the dough. Starting from the bottom of the dough ball, roll the dough onto itself until it forms a ball.


Cup the far side of the dough with both hands, and pull towards you, tightening the dough’s surface.
Use a bench scraper to lift the folded dough into the prepared banneton, with the seam side up. Pinch the seams together.


Cold Proof
Place the banneton into a plastic bag and refrigerate for 8-24 hours. I like to do this step overnight.
You can skip the overnight cold proof and, instead, bake the bread the same day. Let the dough rise in the proofing basket inside a large plastic bag for a few hours or until the dough is airy and jiggles a bit. After the dough is done proofing, place it into the refrigerator while preheating the oven to let the butter cool a bit before baking. Cold dough prevents butter from leaking out and is easier to score.
What if You Don’t Have a Banneton?
While its nice to have, you don’t need a fancy proofing basket to bake good bread. After the dough is shaped, place the dough onto a piece of parchment paper with the seam side down. Then, using the parchment paper as handles, lift the dough back into the bowl. Cover the bowl and refrigerate.
Preheat the Oven
The next morning, preheat the oven to 450F°/232C° with a Dutch oven in the middle of the oven for 30 minutes.
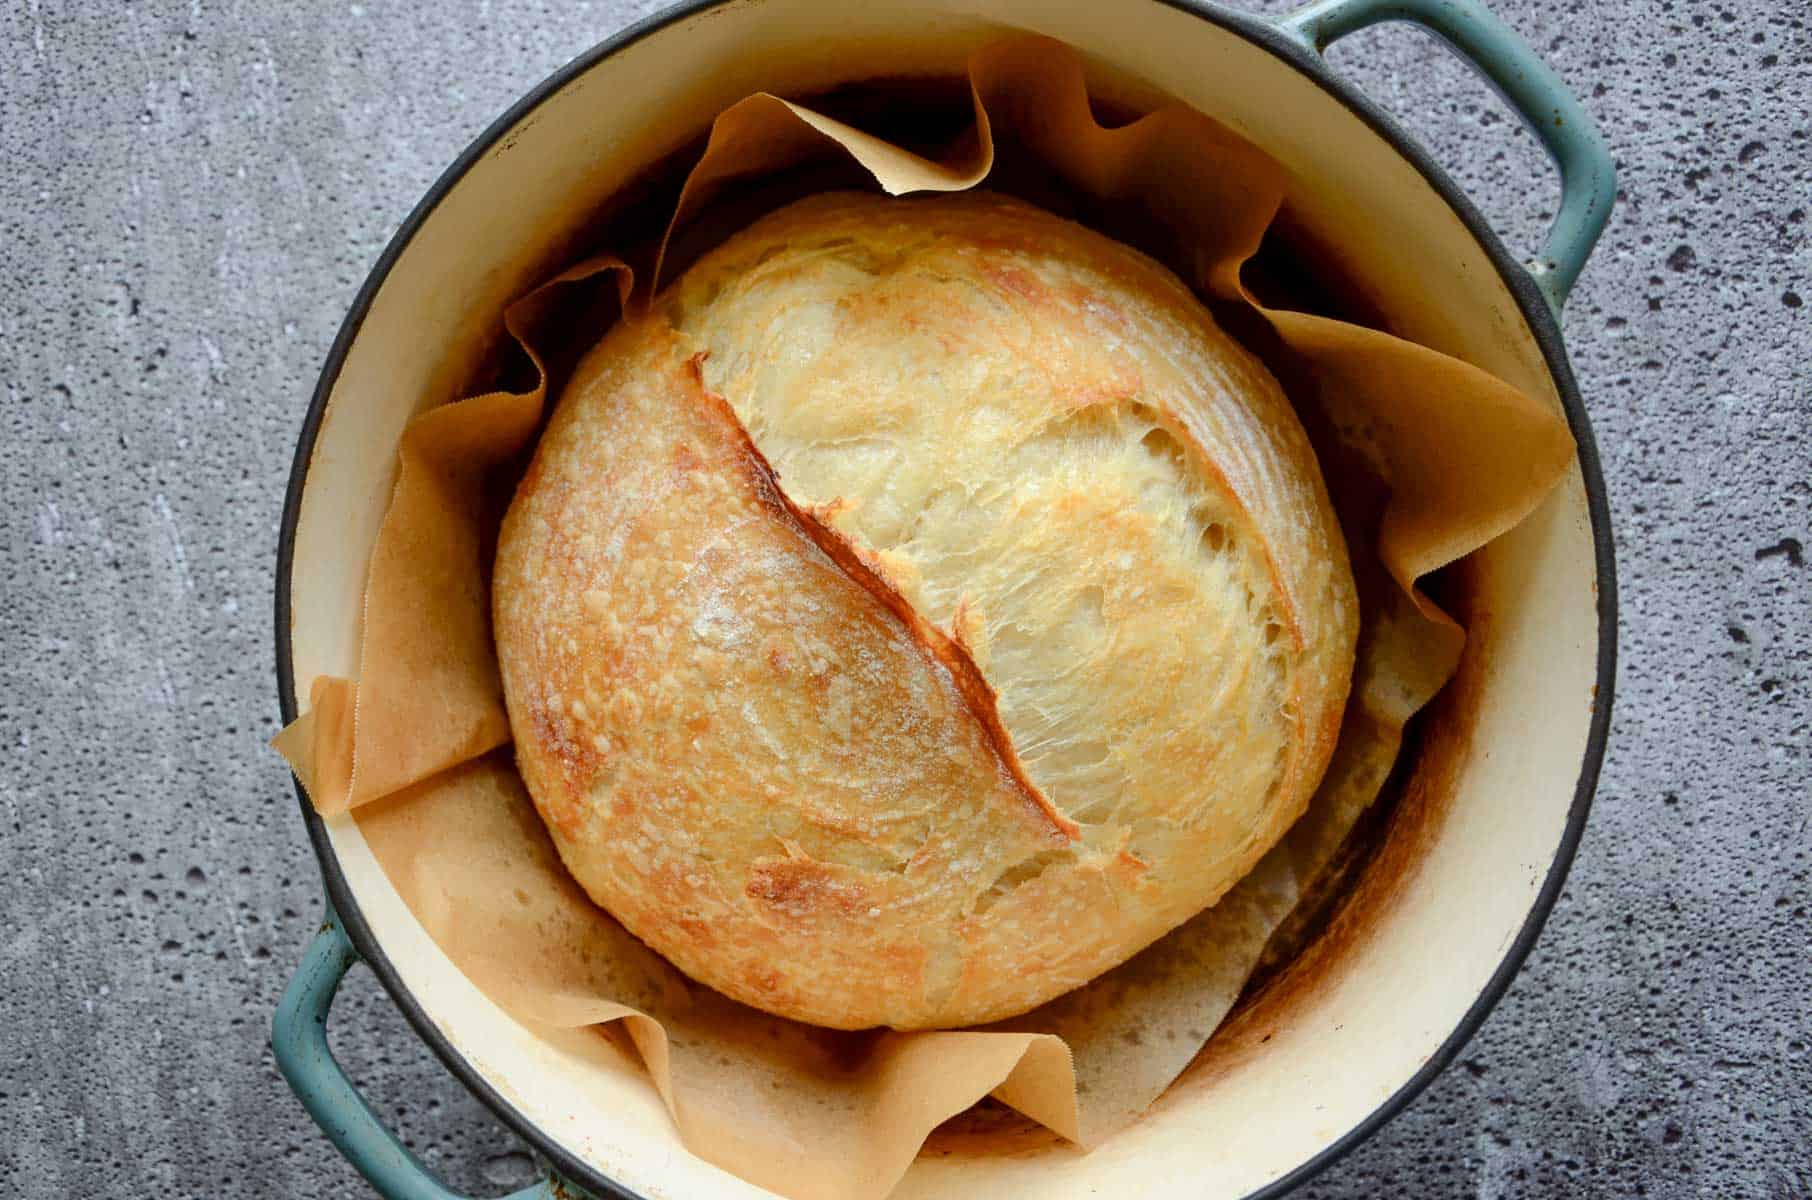
Score and Bake Sourdough Croissant Bread
Turn out the chilled dough onto a piece of parchment paper. Score the top of the loaf roughly 1 inch deep with a lame or a sharp knife.
Carefully remove the hot Dutch oven from the oven and lift the bread using the parchment paper as handles, into the Dutch oven.
Replace the lid and move to the oven.
Lower the temperature to 425°F/218°C and bake with the lid on for 30 minutes. Remove the lid and bake for 10-15 minutes.


Storage
Like most baked goods, this bread is best the day it’s baked. Allow the bread to cool completely before slicing. Store bread in an airtight container and store at room temperature for up to 3 days.
Sourdough Croissant Recipe Tips
- Be sure to use parchment paper, as a little butter may leak out into the Dutch oven.
- The added weight of the butter will slow fermentation compared to a traditional loaf of sourdough bread, so don’t be alarmed when it takes longer than usual.
- Combining the flour and water before adding the salt and sourdough starter gives the flour time to hydrate. In addition, the enzymes are released to make the sugars more available once the starter is added, giving the gluten a chance to begin developing before weighing the dough down with butter.
Sourdough Croissant Bread Sample Schedule
| Day 1: 8:00 am | Mix the levain |
| 11:30 am | Autolyse the dough and rest |
| 12:00 pm | Mix in salt, additional water, and levain to the autolyse dough, and rest |
| 12:30 – 2:00 pm | Stretch and folds, add grated butter on the 2nd and 3rd set of folds. |
| 2:00 – 8:00 pm | Bulk ferment |
| 8:00 – 8:30 pm | Preshape, bench rest, and final shape the dough |
| 8:40 pm | Cold Proof |
| Day 2: 8:00 am | Preheat Dutch oven and bake |
Discard Sourdough Bread FAQs
Do I Need to Use a Kitchen Scale?
I know that buying a kitchen scale seems like one more thing, however, measuring by weight instead of volume ensures consistent sourdough bread doughs. Investing in an inexpensive scale is a great idea if you plan to bake sourdough bread regularly.
What Type of Butter Should I Use in Croissant Sourdough Bread Recipe?
In terms of what type of butter, I like to stick with grade AA American butter over European butter. With a higher fat content and less water, the European butter will leak more fat as it bakes. Not only are American butters less expensive, but they have a higher water content, and this water turns to steam in the oven, which is a good thing for sourdough croissant bread loaf.


I’d love to hear from you! If you made this Croissant Sourdough Bread recipe and loved it, I would love it if you gave it 5 stars! Happy Baking!

Sourdough Croissant Bread Recipe
Want to Save This Recipe?
Enter your email & I’ll send it to your inbox. Plus, get great new recipes from me every week!
By submitting this form, you consent to receive emails from Lockrem Homestead
Equipment
- kitchen scale
- large mixing bowl
- 7 qt Dutch Oven
- Danish dough whisk
- parchment paper
- banneton or proofing basket
- lame or sharp knife
- Digital thermometer
- box grater
Ingredients
Levain:
- 42 g starter
- 42 g water
- 42 g all-purpose flour
Bread dough:
- all of the levain or 125 g (½ cup) sourdough starter
- 350 g water, divided 1½ cups
- 500 g bread flour 4 cups
- 10 g salt 2 tsp
Add-Ins
- 113 g unsalted butter ½ cup
Instructions
Create the Levain
- 1:1:1 Levain: This recipe calls for a levain mixed the night before you mix the dough. Combine 42 g sourdough starter, 42 g water, and 42 g all-purpose flour in a small bowl. Cover and let it sit at room temperature for 8 hours.
- The levain is ready when it has doubled in size and has lots of bubbles, with a slightly sour aroma.
- Grate 113 g (½ cup) unsalted butter into a small dish and refrigerate until ready to add to the dough.
Autolyse
- Add 320 g (1⅓ cups) water and 500 g (4 cups) bread flour to a large bowl and mix with a Danish dough whisk until a shaggy dough forms and all of the flour is incorporated. I found that it helped to use my hands to work the final bits of flour into the dough.
- Cover the bowl and rest for 30 minutes.
Mix the Dough
- Combine 10 g (2 tsp) salt with the remaining 30 g (2 tbsp) water and stir to dissolve the salt. Pour the salty water into the bowl over the dough with all of the ripe levain, and mix until fully combined.
- I find that my hands are the best tool for this job. Use the pincer method to work the levain and salt into the dough. Squeeze the dough between your thumb and fingers, pinching the dough into sections. Rotate the dough, and pinch another section until the levain and liquid are adequately distributed throughout the dough.
- Cover the bowl and let it rest for 30 minutes.
Stretch and Folds | Strengthen the Gluten
- Grab the edge of the dough and lift it straight up before folding it over onto itself. Turn the bowl a quarter turn, and repeat, working your way around the sides of the bowl.
- Initially, the dough will be loose, but after 10-15 folds, the dough begins to come together. Continue to stretch and fold the dough until the dough becomes resistant. This completes one set of stretch and folds. Cover the bowl and rest for 30 minutes
- Continue stretching and folding the dough for a total of 4 sets with 30 minute intervals.
- On the second set of stretch and folds, add half of the grated butter over the top of the dough. Using the same stretch and fold method, incorporate the butter into the dough. Cover and rest for 30 minutes.
- Add the remaining grated butter to the dough on the third set of stretch and folds. Cover and rest for 30 minutes.
- By the fourth and final set of stretch and folds, the dough will be elastic and smooth, with the grated butter distributed throughout the dough.
Bulk Ferment
- After the stretch and folds are completed, cover the bowl and let it rest at room temperature to bulk ferment. The dough is done fermenting when you see plenty of air bubbles beneath the surface, the dough has almost doubled in size, and the edge of the dough where it meets the bowl domes down slightly.Because the dough is heavier than a traditional sourdough bread dough with the added butter, the total bulk fermentation time may be longer than normal. Keep an eye on the dough's temperature to make sure the butter doesn't soften too much. Aim to keep the dough at 70°F/21°C. Place the bowl into the refrigerator to cool the dough temperature as needed.
Preshape
- Turn out the dough onto a lightly floured work surface. Using a bench scraper and one hand, rotate the dough while pushing the dough under with the bench scraper, into a boule shape.
Bench Rest
- Let the preshaped dough rest on the counter for 30 minutes uncovered. It's normal for the dough to flatten a bit as it rests. This allows the gluten to relax a bit before its final shaping.
Shape
- Prepare your banneton by dusting it with a bit of rice flour to prevent the dough from sticking.
- Fold the bottom of the dough up to the middle and gently press it into the dough.
- Pull the right side of the dough out a bit to stretch it before folding it over the middle of the dough. Repeat with the left side of the dough.
- Starting from the bottom of the dough ball, roll the dough onto itself until it forms a ball. Cup the far side of the dough with both hands, and pull towards you, tightening the dough's surface.
- Use a bench scraper to lift the folded dough into the prepared banneton, with the seam side up. Pinch the seams together.
Cold Proof
- Place the banneton into a plastic bag and refrigerate for 8-24 hours. I like to do this step overnight.You can skip the overnight cold proof and bake the bread the same day. Let the dough rise in the proofing basket inside a large plastic bag for a few hours or until the dough is airy and jiggles a bit. After the dough is done proofing, place it into the refrigerator while preheating the oven to let the butter cool a bit before baking. Cold dough prevents butter from leaking out and is easier to score.
Preheat the Oven
- The next morning, preheat the oven to 450°F/232°C with a Dutch oven in the middle of the oven for 30 minutes.
Score and Bake
- Turn out the chilled dough onto a piece of parchment paper. Score the top of the loaf roughly 1 inch deep with a lame or a sharp knife.
- Carefully remove the hot Dutch oven from the oven and lift the bread using the parchment paper as handles, into the Dutch oven. Replace the lid and place back into the oven.
- Lower the temperature to 425°F/218°C and bake with the lid on for 30 minutes. Remove the lid and bake for 10-15 minutes.
Storage
- Like most baked goods, they’re best the day they’re baked. Allow the bread to cool completely. Store bread in an airtight container and store at room temperature for up to 3 days.
Notes
Do you have to use a levain in this recipe?
Other recipe notes:
- Combining the flour and water before adding the salt and sourdough starter gives the flour time to hydrate. In addition, the enzymes are released to make the sugars more available once the starter is added, giving the gluten a chance to begin developing before weighing the dough down with butter.
- It’s important that the dough maintains a temperature of 70°-72°F/21°-22°C. Similar to making other pastry dough, like rough puff pastry or croissants, it’s important that the layers of butter stay cool to prevent too much butter leakage during the bake time. Take the temperature using a digital thermometer to monitor the dough temp. Place the bowl in the fridge for 10 minutes to cool the dough down if it starts to get too warm.
Tips
- Be sure to use parchment paper, as a little butter may leak out into the Dutch oven.
- The added weight of the butter will slow fermentation compared to a traditional loaf of sourdough bread, so don’t be alarmed when it takes longer than usual.
With its baked in, buttery layers, this loaf is one of my absolute favorites! Warm out of the oven, or toasted days later, this bread is sure to be your newest obsession! Leave your questions and comments below, and until then, happy eating!
Loved the way my loaf turned out!
Yay!