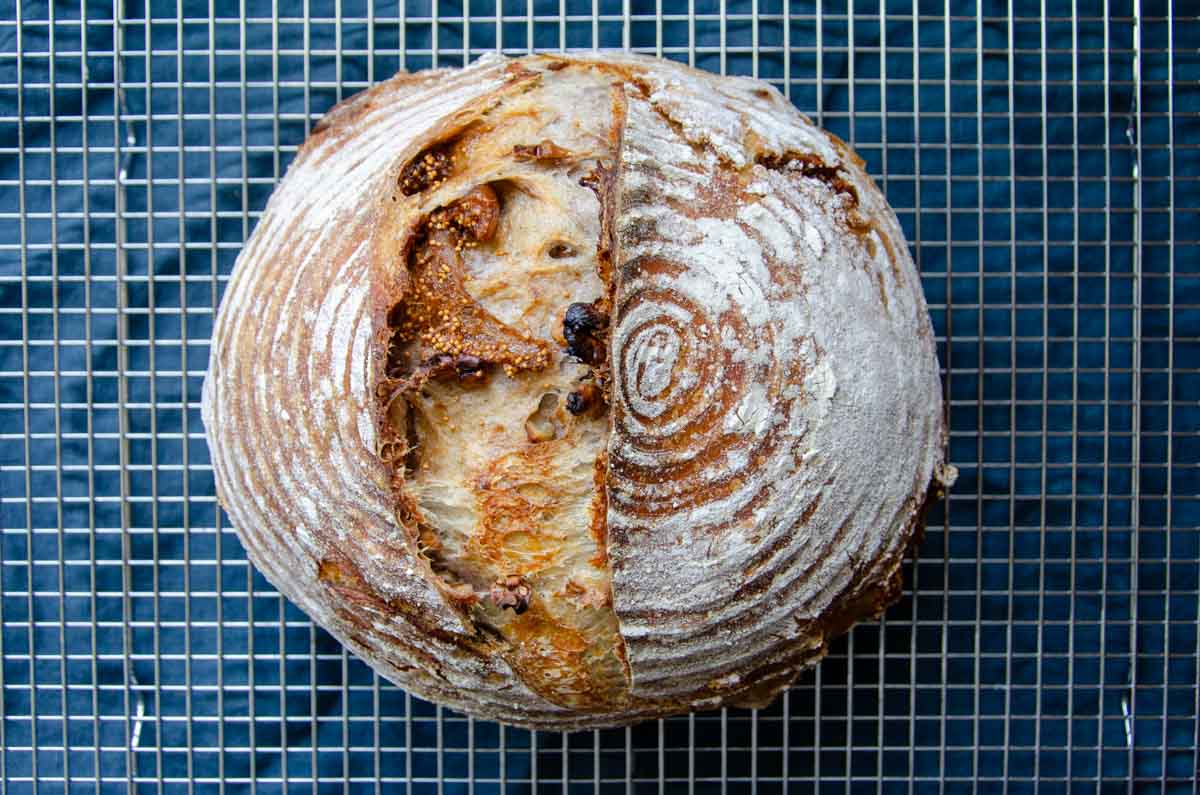
Fig and Walnut Sourdough Bread
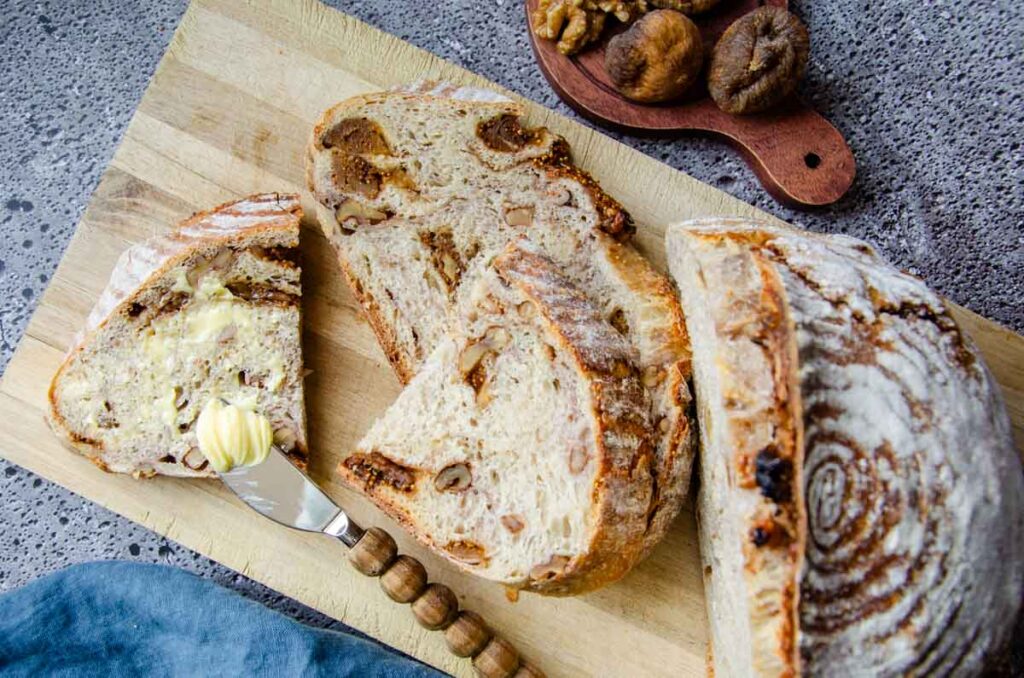
Fig and walnut sourdough bread is a deliciously sweet and crunchy inclusion bread. Made with active sourdough starter, sweet figs, and crunchy walnuts, this bread has a chewy texture and great flavor. Enjoy a slice toasted and slathered in butter for breakfast or topped with cream cheese for an afternoon snack.
Save This For Later!
We’ll email this post to you so it doesn’t get lost in your open tabs!
By submitting this form, you consent to receive emails from Lockrem Homestead
New to Sourdough?
If you’re new to sourdough baking, these beginner-friendly guides will help you get started with confidence. Learn how to make a Sourdough Starter from Scratch, feed and maintain it with the Complete Sourdough Starter Guide, and bake your first loaf with this Easy Sourdough Bread Recipe. Together, these guides create a solid foundation for your sourdough journey.
Lately, I’ve been on a kick experimenting with different inclusions in my sourdough breads. While I still bake my easy sourdough bread weekly, inclusion breads are a nice change of pace with their varied flavors.
The possibilities are endless with so many add-ins. Creating savory loaves of bread, like jalapeno cheddar sourdough bread or rosemary olive parmesan sourdough bread, make great additions to dinners.
Contrasting on the sweeter side, double chocolate sourdough bread and cinnamon raisin sourdough bread are delicious for a subtle, sweet breakfast option.
I’m partial to enjoying walnut and fig bread during the fall months, but it can be made any time of the year since it’s filled with pantry staples. I love the versatility it offers.
Sourdough is a delicious way to be creative, so have fun experimenting. Whatever flavor you choose, you can’t go wrong with homemade sourdough bread!
Why You’ll Love Sourdough Fig and Walnut Bread
- Sourdough Goodness – Sourdough breads are a step above the rest in terms of health. The simple step of fermenting the dough helps reduce the phytic acid found in whole grains, helping make the bread easier to digest. In addition, sourdough breads have a lower glycemic index and more nutrients readily available, making it a better choice.
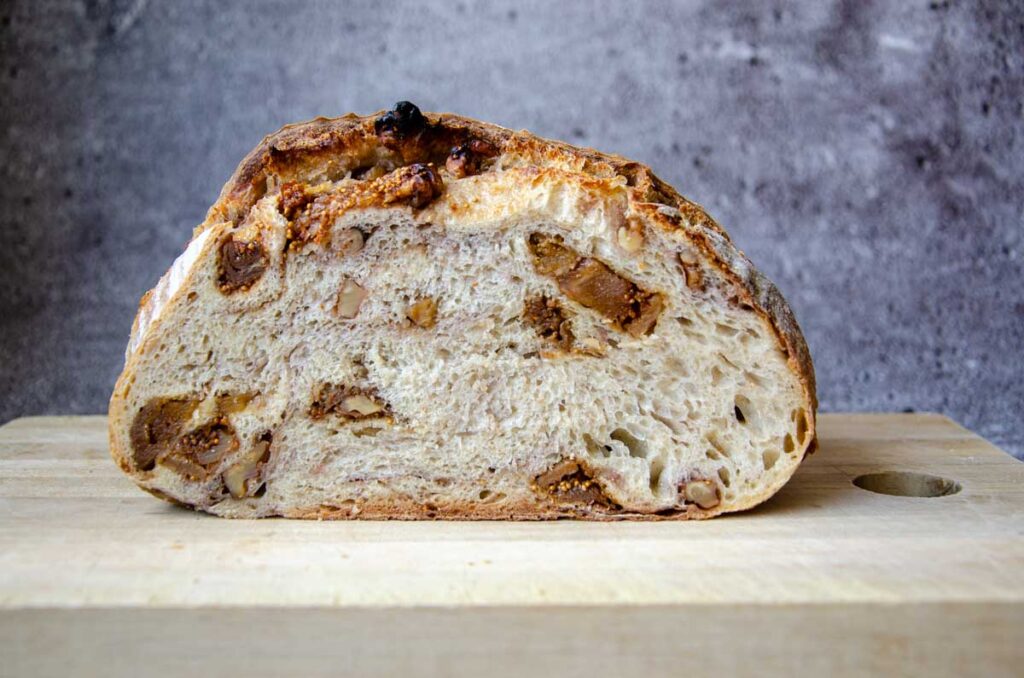
- Dense and Chewy Texture – The added dried figs and walnuts create a dense bread that’s loaded with a chewy texture and a sweet, nutty flavor.
- Flavor – The earthy flavor from the walnuts, contrasting with the fruity figs, creates a deep, balanced flavor that pairs perfectly with salty cheese such as brie or cream cheese.
Equipment You’ll Need for Sourdough Bread
- Bowl
- Kitchen scale – A vital tool for measuring sourdough bread dough ingredients. They’re not expensive and will help ensure accurate, consistent measurements.
- Danish dough whisk – I like how a Danish dough whisk cuts through the dough to incorporate the ingredients. A great tool if you plan to bake sourdough bread regularly.
- Lame – A special scoring tool that holds a sharp razor. You can also use a sharp knife, but a lame makes it easy for small, intricate scoring.
- 9″ Banneton basket – A banneton is a proofing basket that provides support for the bread dough as it proofs. Dust with a little bit of rice flour to prevent the dough from sticking.
- Parchment paper or dough sling
- 7 qt Dutch oven or larger – Using a Dutch oven is the best way for home bakers to create an artisan loaf of bread with a beautiful crust. The enclosed baking environment traps steam, allowing the crust to stay moist and expand.
- Digital thermometer – Use to read the bread’s internal temperature to know when the bread is done baking. Great for beginner bakers as they improve their bread-baking skills.
- Cooling rack
Baking with Figs
Baking with figs adds a bright, fruity sweetness to the bread, while their moisture helps the bread stay fresh longer. I recommend using dried figs as they’re available year-round and are better suited for baking than fresh figs. The soft, jammy consistency of fresh figs doesn’t hold up well in bread baking.
Fig and Walnut Bread Ingredients
Sourdough fig and walnut bread is a delicious inclusion bread made with only 7 ingredients.
- Sourdough starter – This bread recipe calls for active sourdough starter, having been fed recently, and shows plenty of signs of life with bubbles and doubled in size.
- Flour – Bread flour with a protein content of 12-14 percent gives the bread a chewier crust since it is able to develop a stronger gluten structure. The addition of rye flour adds a nutty flavor that pairs well with the walnuts. You can substitute all-purpose flour for bread flour, but the bread will be less chewy and not as tall.
- Water
- Salt – Salt flavors the bread as well as improves the gluten structure.
- Walnuts – The crunch of walnuts gives the bread some texture and a nutty flavor.
- Dried figs – I prefer dried figs over fresh figs as they have a sweeter flavor and are available year-round.
How To Make Fig and Walnut Sourdough Bread
Mix the Dough
Dissolve 125 g (½ cup) active sourdough starter and 350 g (1 ½ cups) water in a large bowl. Next, add 500 g (4 cups) bread flour, 50 g (¼ cup) rye flour, and 16 g (1 tbsp) salt and combine with a Danish dough whisk until all of the dry bits of flour are mixed well.
Cover the bowl and let the dough rest for 30 minutes. This allows the flour to properly hydrate.
While the dough rests, cut the dried figs into quarters and add them to a small bowl. Cover the figs with hot water and let soak for 10-15 minutes, hydrating the figs.
Coarsely chop the walnuts on a cutting board and set aside.

Stretch and Fold
A series of stretches and folds strengthens the gluten transforming the dough from shaggy to smooth and elastic.
With one hand holding the bowl, use the other hand to grab the side of the dough and lift it straight up, stretching the dough, before folding it over onto itself in the middle of the dough.
Rotate the bowl a quarter turn and stretch and fold the next section of the dough. Repeat stretching and folding the dough as you rotate the bowl until the dough starts to feel resistant, roughly 6-8 folds.
Cover the bowl with a kitchen towel or a piece of plastic wrap to keep the dough from drying out. I usually use a large plate. Let the dough rest for 30 minutes. This completes the first set of stretch and folds.


Before the second set of stretch and folds, drain the figs, pat dry, and add them to the dough along with the chopped walnuts. Stretch and fold the dough, incorporating the figs and walnuts evenly into the dough.
Continue for a total of 3 sets of stretch and folds at 30-minute intervals. The second set of stretch and folds may not completely disperse the add-ins but generally, they are by the completion of the third set.


Bulk Fermentation | First Rise
I like to tuck as many of the figs into the dough before the bulk ferment. Sometimes you need to do an extra set of stretch and folds for this to happen. It doesn’t have to be perfect, just do the best you can.
After the last set of stretch and folds, cover the bowl and let the dough rise in a warm place in the kitchen. As the dough bulk ferments over the next couple of hours, you’ll start to notice small bubbles appear beneath the surface of the dough. The dough is ready when the side of the dough where it meets the container is domed and it has almost doubled in size.


The exact amount of time the bread dough takes to bulk ferment largely depends on the temperature of your kitchen. Warm air temperature will ferment the dough faster than in a cool kitchen.
Shape Dough
Using a bowl scraper or silicone spatula, turn out the dough onto a lightly floured work surface. Stretch the dough into a square roughly 10 x 10.
Fold the bottom half of the dough up to the middle of the dough. Next, fold the top half of the dough down, overlapping the bottom half.


Fold each side towards the middle of the dough. Then, flip the dough over so that the seams are facing down.


Gently shape the dough by cupping the far edge of the dough with both hands and pull it towards yourself. Reposition your hands on another edge of the dough and pull towards you. Repeat a few times until the ball of dough is in the shape of a circle and the top of the dough is stretched tight. The tight surface tension helps create a taller loaf. Using a dough scraper can help create tension in the dough, promoting a better consistent shape.


What if You Don’t Have a Banneton?
While its nice to have, you don’t need a fancy proofing basket to bake good bread. After the dough is shaped, place the dough onto a piece of parchment paper with the seam side down. Then, using the parchment paper as handles, lift the dough back into the bowl. Cover the bowl and refrigerate.
Cold Ferment | Second Ferment
Prep the banneton by dusting it evenly with rice flour to prevent the dough from sticking.
Lift the shaped dough into a banneton with the seams facing up. Pinch together any seams that aren’t sealed close.
Place the banneton in a plastic bag and refrigerate for 12 – 24 hours.
If you choose to bake the bread the same day you mix the dough, let the bread have its second rise covered in the banneton at room temperature for a few hours until the dough is puffy and jiggles when shaken a bit. Preheat the oven and bake as directed.
Score and Bake
The next day preheat the Dutch oven and lid at 450°F/230°C for 45 minutes.
Remove the dough from the fridge and turn it over onto a piece of parchment paper. Score the top of the dough with a sharp knife or razor blade. I find that a simple cut is best for inclusion loaves. Carefully lift the dough into the preheated Dutch oven, replace the lid, and place the Dutch oven back into the oven.
Bake for 35 minutes with the lid on. Remove the lid and bake for an additional 15 minutes. The bread is done when the top is golden brown, and the internal temperature reaches 200°F/93°C with a digital thermometer.
Remove the bread from Dutch oven and place on a wire rack. Cool completely before cutting to avoid a gummy texture.


How to Store Fig & Walnut Sourdough Bread
Allow the bread to cool completely before slicing it and placing it into an airtight container. Store at room temperature for up to 2 days. If you still have bread after 2 days, wrap it in plastic wrap and freeze it. To enjoy, pull out a few pieces at a time and toast.
Tips for Fig Sourdough Bread
- Remove any additional moisture from the figs before adding them to the dough, or they’ll affect the recipe’s hydration levels.
- A strong, healthy starter is key to a successful loaf. Feed your starter regularly with higher ratio feedings to keep it active and healthy for leavening your dough.
- Try to keep the figs inside the dough. If exposed, they have a higher chance of burning due to their high sugar content.
Ways to Enjoy Walnut Fig Sourdough Bread
- The sweet fig flavor and crunchy walnuts make this a treat to eat. Slice a piece or toast it, and top with butter, jam, or cream cheese for breakfast or a quick snack.
- If the bread becomes stale, cube it and bake it in a baked French toast casserole. Top with a dusting of powdered sugar or a drizzle of homemade maple syrup.
- Slice thinly and make a grilled cheese sandwich.
- Make a breakfast sandwich with salty bacon and a fried egg. The sweet and savory combo is a tried and true favorite!
Sourdough Fig Bread Sample Baking Schedule
Baking with sourdough can be a bit intimidating at first since so many variables are involved. But once you understand the process, it’s quite simple and highly flexible to accommodate your schedule. Here is a sample baking schedule.
| Day 1: 8:00 am | Mix the dough and rest for 30 minutes/prep the add-ins |
| 8:30- 9:30 am | 3 sets of stretch and folds with 30-minute intervals |
| 9:30 am – 2:00 pm | Bulk ferment at room temperature |
| 2:00 pm | Shape the dough and place into a proofing basket |
| 2:10 pm – 8:00 am | Cold proof |
| Day 2: 8:00 am | Preheat Dutch oven |
| 8:45 am | Score and bake the bread dough |
| 9:35 am | Place bread on a cooling rack |
Sourdough Fig and Walnut Bread FAQs
How Do You Know if the Sourdough Bread is Done?
Remove the loaf from the Dutch oven and give the loaf a gentle tap on the bottom of the loaf. It will sound hollow when it’s done. Another option to check if it’s done is to use a digital thermometer and check the bread’s internal temperature. The bread is done when it reaches 200°F/93°C.
Do I Need to Use a Kitchen Scale?
I know that buying a kitchen scale seems like one more thing, however, measuring by weight instead of volume ensures consistent sourdough bread doughs. Investing in an inexpensive scale is a great idea if you plan to bake sourdough bread regularly.
How Do I Keep the Bottom of My Bread From Burning?
Sometimes the bottom of the sourdough bread gets too hot in the oven and burns. If this happens, preheat the Dutch oven with a baking sheet on the rack beneath it. This will help shield the heat and prevent the bottom from getting too dark.
How Do I Add the Figs and Walnuts?
Add the figs and walnuts during the stretch and folds is an easy way to incorporate them into the dough.
However, you can distribute inclusions in sourdough by using lamination as shown in my artisan sourdough pumpkin and pecan bread. Stretch the dough into a rectangle, and sprinkle half of the inclusions over the dough, leaving a 1-inch border. Then, fold the dough, add more inclusions, and then roll up the dough.


I’d love to hear from you! If you made this Fig & Walnut Sourdough Bread Recipe and loved it, I would love it if you gave it 5 stars! Happy Baking!
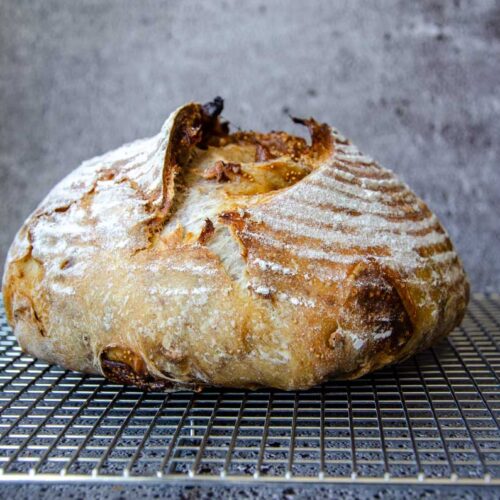
Fig and Walnut Sourdough Bread
Want to Save This Recipe?
Enter your email & I’ll send it to your inbox. Plus, get great new recipes from me every week!
By submitting this form, you consent to receive emails from Lockrem Homestead
Equipment
- 1 large mixing bowl
- 1 Danish dough whisk
- 1 9" banneton or proofing basket
- 1 lame
- Dutch Oven
- cooling rack
- digital kitchen scale
Ingredients
- 125 g active sourdough starter
- 350 g water
- 1 tbsp salt
- 500 g bread flour
- 50 g rye flour
- 200 g figs 1 cup, roughly 8 dried figs
- 85 g walnuts ¾ cup
Instructions
Mix the Dough
- Dissolve 125 g (½ cup) active sourdough starter and 350 g (1 ½ cups) water in a large bowl. Next, add 500 g (4 cups) bread flour, 50 g (¼ cup) rye flour, and 16 g (1 tbsp) salt and combine with a Danish dough whisk until all of the dry bits of flour are mixed well.
- Cover the bowl and let the dough rest for 30 minutes. This allows the flour to properly hydrate.
- While the dough rests, cut the dried figs into quarters and add them to a small bowl. Cover the figs with hot water and let soak for 10-15 minutes, hydrating the figs.
- Coarsely chop the walnuts on a cutting board and set aside.
Stretch and Fold
- A series of stretches and folds strengthens the gluten transforming the dough from shaggy to smooth and elastic.
- With one hand holding the bowl, use the other hand to grab the side of the dough and lift it straight up, stretching the dough, before folding it over onto itself in the middle of the dough. Rotate the bowl a quarter turn and stretch and fold the next section of the dough. Repeat stretching and folding the dough as you rotate the bowl until the dough starts to feel resistant, roughly 6-8 folds.
- Cover the bowl with a kitchen towel or a piece of plastic wrap to keep the dough from drying out. I usually use a large plate. Let the dough rest for 30 minutes. This completes the first set of stretch and folds.
- Before the second set of stretch and folds, drain the figs, pat dry, and add them to the dough along with the chopped walnuts. Stretch and fold the dough, incorporating the figs and walnuts evenly into the dough.
- Continue for a total of 3 sets of stretch and folds at 30-minute intervals. The second set of stretch and folds may not completely disperse the add-ins but generally, they are by the completion of the third set.
Bulk Fermentation | First Rise
- I like to tuck as many of the figs into the dough before the bulk ferment. Sometimes you need to do an extra set of stretch and folds for this to happen. It doesn't have to be perfect, just do the best you can.
- After the last set of stretch and folds, cover the bowl and let the dough rise in a warm place in the kitchen. As the dough bulk ferments over the next couple of hours, you’ll start to notice small bubbles appear beneath the surface of the dough. The dough is ready when the side of the dough where it meets the container is domed and it has almost doubled in size.
Shape Dough
- Using a bowl scraper or silicone spatula, turn out the dough onto a lightly floured work surface. Stretch the dough into a square roughly 10 x 10.
- Fold the bottom half of the dough up to the middle of the dough. Next, fold the top half of the dough down, overlapping the bottom half.
- Fold each side towards the middle of the dough. Then, flip the dough over so that the seams are facing down.
- Gently shape the dough by cupping the far edge of the dough with both hands and pull it towards yourself. Reposition your hands on another edge of the dough and pull towards you. Repeat a few times until the ball of dough is in the shape of a circle and the top of the dough is stretched tight.
Cold Ferment | Second Ferment
- Prep the banneton by dusting it evenly with rice flour to prevent the dough from sticking.
- Lift the shaped dough into a banneton with the seams facing up. Pinch together any seams that aren’t sealed close.
- Place the banneton in a plastic bag and refrigerate for 12 – 24 hours.
Score and Bake
- The next day preheat the Dutch oven and lid at 450°F/230°C for 45 minutes.
- Remove the dough from the fridge and turn it over onto a piece of parchment paper. Score the top of the dough with a sharp knife or razor blade. I find that a simple cut is best for inclusion loaves. Carefully lift the dough into the preheated Dutch oven, replace the lid, and place the Dutch oven back into the oven.
- Bake for 35 minutes with the lid on. Remove the lid and bake for an additional 15 minutes. The bread is done when the top is golden brown and the internal temperature reaches 200°F/93°C with a digital thermometer.
- Remove the bread from Dutch oven and place on a wire rack. Cool completely before cutting to avoid a gummy texture.
My favorite way to eat this is toasted and dipped into warm brie cheese. There’s nothing yummier! I look forward to hearing what you think and what questions you have about this delicious loaf!
iv just cooked this fig and walnut loaf. Wonderful flavour my husband and I really enjoyed the flavours.
just a few questions, we did an oval shap sliced the top ect. The crush went really brown I covered with foil for the second 30 minutes to get to 200 internal temperature.
very crusty and quite colored inside not as white as your picks. How can I make the crust not so hard? live the the recipe and thanks for sharing 👍
I wonder if you baked the bread too long. You said you “covered with foil for the second 30 minutes,” however, the recipe bake times are 35 minutes with the Dutch oven lid on, and 15 minutes without the lid. Let me know if this helps!