
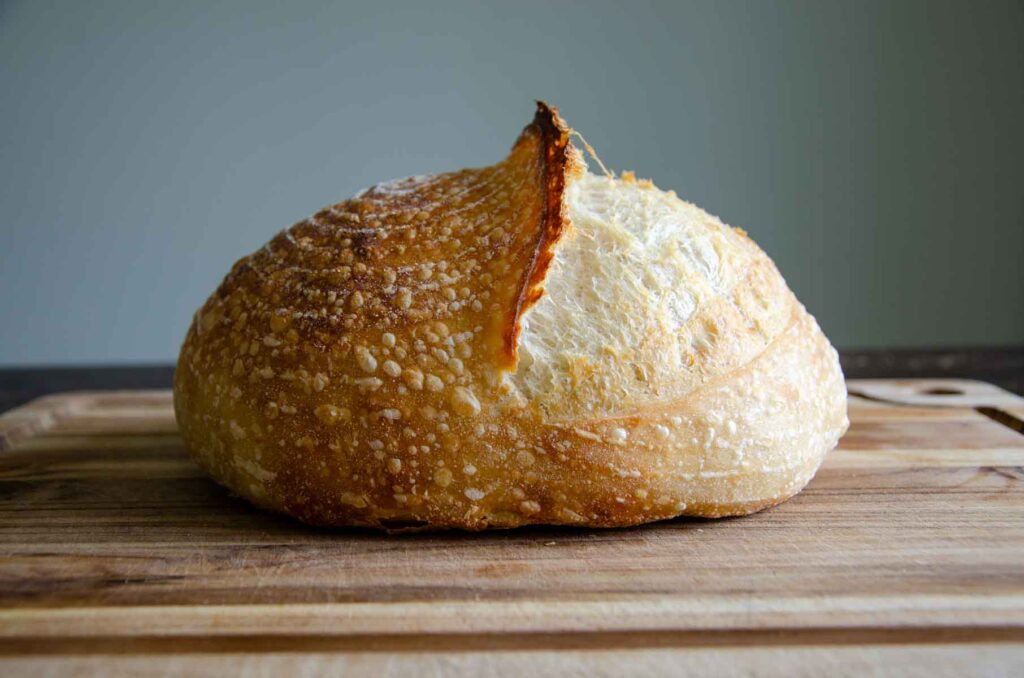
Honey Oat Sourdough Bread Recipe
This sourdough honey oat bread recipe uses honey, oatmeal, and a touch of whole wheat flour and is naturally leavened with a sourdough starter. The end result is a soft and fluffy bread similar to sourdough sandwich bread but with hearty and earthy flavors.
“This bread is beautiful!” – Tracy

Save This For Later!
We’ll email this post to you so it doesn’t get lost in your open tabs!
By submitting this form, you consent to receive emails from Lockrem Homestead
Sourdough Goodness
I think we can all agree that homemade bread is always a good idea. I have found that baking bread using a sourdough starter fits easily into my busy life. It is a delicious adventure with so many avenues to explore.
You can use a sourdough active starter, full of wild yeast and beneficial bacteria, in a wide variety of bread recipes. From sweet sourdough cinnamon raisin bread to savory pepperoni sourdough bread. But that’s not all. You can also use the sourdough discard to make delicious muffins, scones, and sauces. Be sure to explore my sourdough recipes.
New to Sourdough?
If you’re new to sourdough baking, these beginner-friendly guides will help you get started with confidence. Learn how to make a Sourdough Starter from Scratch, feed and maintain it with the Complete Sourdough Starter Guide, and bake your first loaf with this Easy Sourdough Bread Recipe. Together, these guides create a solid foundation for your sourdough journey.
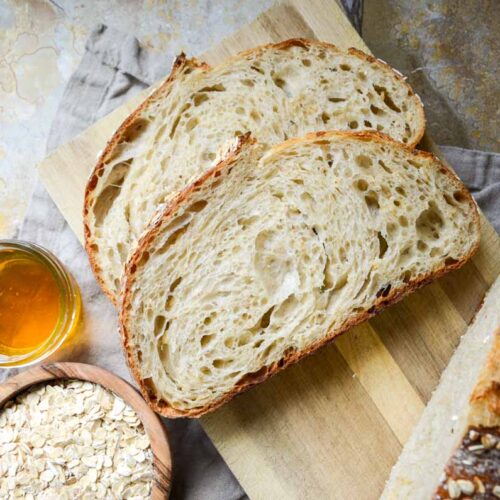
What is Sourdough Oat Honey Bread?
This easy honey oatmeal bread recipe combines the sweetness of honey and the nutrient-dense goodness of rolled oats, along with a blend of whole wheat flour and bread flour to create a versatile and delicious bread the whole family will love.
Honey is a great natural sugar that helps in creating a softer loaf, while the oats give the bread a bit of chew. Enjoy a slice of sourdough honey oat bread and whole grains’ health benefits in every bite.
The bread uses a sourdough starter to replace commercial yeast that’s typically found in breads today. Using a sourdough starter is an old way of making bread that’s having a resurgence of late.
Why You’ll Love Honey Oat Sourdough Recipe
- The hearty, chewy texture and lightly sweetened honey flavor make this bread a family favorite.
- Adding whole grains to delicious bread makes it easy to eat more fiber and whole foods.
- This bread is easy to work with and shape into a boule (round) or a batard (oval) loaf.
- Baking honey oat bread is a great way to learn how to add inclusions to sourdough bread for beginner sourdough bakers.

Honey Oat Sourdough Bread Ingredients
- Sourdough starter – Use an active sourdough starter that’s been fed recently and shows signs of life, full of bubbles, risen, and has a mild yeasty aroma. I feed my sourdough starter a ratio of 1:1:1.
- Flour – A blend of whole-wheat flour and bread flour gives this bread great texture, a slight nutty flavor, and makes it easy to work with. If you have both bread flour and all-purpose flour on hand, I recommend using bread flour. All-purpose flour definitely works, but you get a sturdier and more bread-like texture from bread flour.
- Water – I like to use warm water during the cooler months, and cool water during the summer.
- Salt – Salt flavors the bread and helps with gluten development.
- Honey – Don’t worry about the grade of honey since the high baking temperature will kill any beneficial enzymes in the honey. Save the raw, unpasteurized, and unfiltered honey for fresh eating, where you’ll get the highest health benefits.
- Oats – I suggest using old-fashioned oats, also called rolled oats, to give the bread a better texture. Quick oats will work too, but they tend to disappear in the bread as it bakes.
Equipment You’ll Need for Sourdough Bread
- Bowl
- Kitchen scale
- Danish dough whisk
- Lame
- 9″ Banneton basket
- Parchment paper or dough sling
- 7 qt Dutch oven or larger
- Digital thermometer
- Cooling rack
How to Make Honey Oatmeal Bread Instructions
Mix the Dough
Add 50 g (2 tbsp) honey and 350 g (1 ½ cups) water in a large mixing bowl and stir until the honey dissolves.
Add 125 g ( ½ cup) bubbly sourdough starter to the bowl, stirring to incorporate. Combine 438 g (3½ cups) bread flour, 62 g (½ cup) whole wheat flour, 50 g (½ cup) rolled oats, and 10 g (2 tsp) salt in the bowl and stir with a Danish dough whisk until a shaggy dough forms. Be sure to mix in all the flour at the bottom of the bowl.
Cover the bowl and allow to rest for 30 minutes. This lets the flour properly hydrate.


Stretch and Folds
A series of stretch and folds builds up the gluten structure in the same way traditional kneading does, but with a fraction of the effort. With time, the shaggy dough (first picture below) transforms into a smooth and elastic dough. (last picture below)
With one hand holding the bowl steady, use the other hand to grab the side of the dough and lift it straight up, stretching the dough, before folding it over onto itself in the middle of the bowl.
Rotate the bowl a quarter turn and stretch and fold the next section of the dough. Repeat stretching and folding the dough as you rotate the bowl until the dough starts to feel resistant, roughly 8-10 folds.
At this point, the dough will feel a little sticky and break easily as it stretches. Cover the bowl with a tea towel or plastic wrap to keep the dough from drying out. This completes one set of stretch and folds.
Continue for a total of 3 sets of stretch and folds at 30-minute intervals.


Bulk Fermentation | First Rise
After the last set of stretch and folds, cover the bowl and let the dough rise in a warm place in the kitchen.
As the dough bulk ferments over the next couple of hours, you’ll start to notice small bubbles appear beneath the surface of the dough. The dough is ready when the edges of the dough where it meets the sides of the bowl are domed and it has almost doubled in size.
My dough was ready after 5 hours in a 72-degree home.


The exact amount of time the bread dough takes to bulk ferment largely depends on the temperature of your kitchen. Warm air temperature will ferment the dough faster than in a cool kitchen.
Shape
I like to preshape the dough before its final shaping, but it’s not necessary.
Turn out the dough onto a lightly floured work surface and spread the dough into a round shape. Use a bench knife set at a shallow angle to the counter, gently push the dough towards you in a sweeping motion, tucking the ends of the dough under itself with your other hand. Continue the rounding motion while tucking the dough under itself until the dough is a uniform ball with a taut top.
Let the dough rest on the counter for 15 – 30 minutes uncovered.
After the bench rest, use the bench scraper to flip the dough over so that the smooth side is on the counter. Fold the top of the dough down to the center of the dough. Next, pull each upper sides of the dough to the middle, followed by each lower sides of the dough, alternating sides as you go.


Finally, starting at the bottom of the dough, roll the dough up. Pinch the ends to seal the sides of the dough.


What if You Don’t Have a Banneton?
While its nice to have, you don’t need a fancy proofing basket to bake good bread. After the dough is shaped, place the dough onto a piece of parchment paper with the seam side down. Then, using the parchment paper as handles, lift the dough back into the bowl. Cover the bowl and refrigerate.
Cold Proof
Prep the banneton by dusting it evenly with rice flour to prevent the dough from sticking. Sprinkle 1 tbsp of rolled oats evenly on the bottom of the banneton.
Lift the shaped dough into a banneton with the seam side facing up. Pinch together any seams that aren’t sealed close.
Place the banneton in a plastic bag and refrigerate for 12 – 24 hours.


If you choose to bake the bread the same day you mix the dough, let the bread have its second rise covered in the banneton at room temperature for a few hours until the dough is puffy and jiggles when shaken a bit. Preheat the oven and bake as directed.
Bake
The next morning, preheat the Dutch oven and lid at 450°F/230°C for 45 minutes.
Remove the dough from the fridge and turn it over onto a piece of parchment paper.
Score the top of your dough with a sharp knife or razor blade. I find that a simple cut is best for inclusion loaves. Carefully lift the dough into the hot Dutch oven, replace the lid, and place the Dutch oven back into the oven.
Bake for 30 minutes with the lid on. Remove the lid and bake for 10-15 minutes. The bread is done when the top is golden brown and the internal temperature reaches 200°F/93°C with a digital thermometer.

Cool
Remove the bread from Dutch oven and place on a wire rack. Cool completely before cutting to avoid a gummy texture.

How To Store Leftover Sourdough Bread
Allow the bread to cool completely before slicing. Place in an airtight container and store at room temperature up to 3 days. Like all baked goods, this bread is best the day you bake it.
If you find you’re not eating the bread quickly, wrap the bread in plastic wrap and freeze it. Cutting the bread into slices makes it easy to grab a piece or two at a time.
Tips for Easy Honey Oat Sourdough Bread
- Honey will accelerate the bulk fermentation stage, so be sure to watch the oat bread dough as it bulk ferments so it doesn’t overproof.
- If you find the oats aren’t sticking to the bread after you turn it out onto the parchment paper, add a bit of water to the top of the dough with a damp towel or wet hands before adding more oats.
Ways To Eat Honey Oat Sourdough Bread
- Honey oat sourdough bread makes excellent toast with jam, butter, or fried eggs.
- Build amazing sandwiches with your favorite meats, cheeses, and fresh toppings like tomatoes, lettuce, and pickles.
- Use to make French toast for a hearty texture.
- Serve as a side with your favorite soup. Some of our family favorites are cheeseburger, turkey wild rice, and creamy acorn squash soups.
Sourdough Honey Oat Bread Sample Baking Schedule
Baking with sourdough can be a bit intimidating at first since so many variables are involved. But once you understand the process, it’s quite simple and highly flexible to accommodate your schedule. Here is a sample baking schedule.
| Day 1 8:00 am | Mix the dough and rest for 30 minutes |
| 8:30- 9:30 am | 3 sets of stretch and folds with 30-minute intervals |
| 9:30 am – 2:00 pm | Bulk ferment at room temperature |
| 2:00 pm | Preshape the dough and bench rest |
| 2:30 pm | Shape the dough and place into a proofing basket |
| 2:30 pm – 8:00 am | Cold proof |
| Day 2: 8:00 am | Preheat Dutch oven |
| 8:45 am | Score and bake the bread dough |
FAQs on Easy Sourdough Honey Oat Bread Recipe
How Do You Know if the Sourdough Bread is Done?
Remove the loaf from the Dutch oven and give the loaf a gentle tap on the bottom of the loaf. It will sound hollow when it’s done. Another option to check if it’s done is to use a digital thermometer and check the bread’s internal temperature. The bread is done when it reaches 200°F/93°C.
How Do I Keep the Bottom of My Bread From Burning?
Sometimes the bottom of the sourdough bread gets too hot in the oven and burns. If this happens, preheat the Dutch oven with a baking sheet on the rack beneath it. This will help shield the heat and prevent the bottom from getting too dark.
Do I Need to Use a Kitchen Scale?
I know that buying a kitchen scale seems like one more thing, however, measuring by weight instead of volume ensures consistent sourdough bread doughs. Investing in an inexpensive scale is a great idea if you plan to bake sourdough bread regularly.


I’d love to hear from you! If you made this Honey Oat Sourdough Bread Recipe and loved it, I would love it if you gave it 5 stars! Happy Baking!
Honey Oat Sourdough Bread Recipe
Want to Save This Recipe?
Enter your email & I’ll send it to your inbox. Plus, get great new recipes from me every week!
By submitting this form, you consent to receive emails from Lockrem Homestead
Equipment
- 1 7 qt Dutch oven or larger
- 1 large mixing bowl
- 1 kitchen scale
- 1 Danish dough whisk
- 1 9" proofing basket
- 1 lame or sharp knife
- parchment paper or bread sling
Ingredients
- 50 g honey 2 tbsp
- 350 g water 1½ cups
- 125 g starter ½ cup
- 438 g bread flour 3½ cups
- 62 g whole wheat flour ½ cup
- 10 g salt 2 tsp
- 50 g rolled oats ½ cup, plus more for topping
Instructions
Mix the Dough
- Add 50 g (2 tbsp) honey and 350 g (1 ½ cups) water in a large mixing bowl and stir to dissolve the honey.
- Add 125 g (½ cup) bubbly sourdough starter to the bowl and stir to incorporate. Next, add 438 g (3½ cups) bread flour, 62 g (½ cup) whole wheat flour, 50 g (½ cup), and 10 g (2 tsp) salt, and stir with a Danish dough whisk until a shaggy dough forms. Be sure to mix in all the flour at the bottom of the bowl.
- Cover the bowl and allow to rest for 30 minutes. This lets the flour properly hydrate.
Stretch and Folds
- With one hand holding the bowl steady, use the other hand to grab the side of the dough and lift it straight up, stretching the dough, before folding it over onto itself in the middle of the bowl.
- Rotate the bowl a quarter turn and stretch and fold the next section of the dough. Repeat stretching and folding the dough as you rotate the bowl until the dough starts to feel resistant, roughly 8-10 folds.
- At this point, the dough will feel a little sticky and break easily as it stretches. Cover the bowl with a tea towel or plastic wrap to keep the dough from drying out. This completes one set of stretch and folds.
- Continue for a total of 3 sets of stretch and folds at 30-minute intervals.
Bulk Fermentation | First Rise
- After the last set of stretch and folds, cover the bowl and let the dough rise in a warm place in the kitchen.
- As the dough bulk ferments over the next couple of hours, you’ll start to notice small bubbles appear beneath the surface of the dough. The dough is ready when the edges of the dough where it meets the sides of the bowl are domed and it has almost doubled in size.My dough was ready after 5 hours in a 72-degree home.
Shape
- I like to preshape the dough before its final shaping.
- Turn out the dough onto a lightly floured work surface and spread the dough into a round shape. Use a bench knife set at a shallow angle to the counter, gently push the dough towards you in a sweeping motion, tucking the ends of the dough under itself with your other hand. Continue the rounding motion while tucking the dough under itself until the dough is a uniform ball with a taut top.
- Let the dough rest uncovered on the counter for a 15 – 30 minute bench rest.
- After the bench rest, use the bench scraper to flip the dough over so that the smooth side is on the counter. Fold the top of the dough down to the center of the dough. Next, pull each upper sides of the dough to the middle, followed by each lower sides of the dough, alternating sides as you go.
- Finally, starting at the bottom of the dough, roll the dough up into a ball. Pinch the ends to seal the sides of the dough.
Cold Proof
- Prep the banneton by dusting it evenly with rice flour to prevent the dough from sticking. Sprinkle 1 tbsp of rolled oats evenly on the bottom of the banneton.
- Lift the shaped dough into a banneton with the seam side facing up. Pinch together any seams that aren’t sealed close.
- Place the banneton in a plastic bag and refrigerate for 12 – 24 hours.If you choose to bake the bread the same day you mix the dough, let the bread have its second rise covered in the banneton at room temperature for a few hours until the dough is puffy and jiggles when shaken a bit. Preheat the oven and bake as directed.
Bake
- The next morning, preheat the Dutch oven and lid at 450°F/230°C for 45 minutes.
- Remove the dough from the fridge and turn it over onto a piece of parchment paper.
- Score the top of your dough with a sharp knife or razor blade. I find that a simple cut is best for inclusion loaves. Carefully lift the dough into the hot Dutch oven, replace the lid, and place the Dutch oven back into the oven.
- Bake for 30 minutes with the lid on. Remove the lid and bake for 10-15 minutes. The bread is done when the top is golden brown and the internal temperature reaches 200°F/93°C with a digital thermometer.
- Remove the bread from Dutch oven and place on a wire rack. Cool completely before cutting to avoid a gummy texture.
Store
- Store leftover honey oat sourdough bread in an airtight container or bread bag for 2 days. Freeze any bread beyond day 2 and pull out a slice or two as you eat them.
Notes
-
- The exact amount of time the bread dough takes to bulk ferment largely depends on the temperature of your kitchen. Warm air temperature will ferment the dough faster than in a cool kitchen.
- Honey will accelerate the bulk fermentation stage, so be sure to watch the oat bread dough as it bulk ferments so it doesn’t overproof.
-
- If you find the oats aren’t sticking to the bread after you turn it out onto the parchment paper, add a bit of water to the top of the dough with a damp towel or wet hands before adding more oats.
hi the ingredient list makes it seem like you incorporate oats in the bread but I’m not seeing that in the instructions.
Robyn,
Thanks for catching that! I corrected the recipe card!
I love the health benefits of sourdough bread…easier digestion, full nutrients, and wild healthy bacteria. The list goes on! You don’t even need the extra seeds and grains that brand names include to improve their bread, but the oats in this loaf are delicious!
Don’t forget to leave your comments and questions below!
The dough was so wet that I had to add almost another cup of flour to it so that I could only barely handle it. It was quite messy . Also, it is a big recipe and I don’t have a 7qt Dutch oven. We shall see! It is on the oven as I type. I’ll let you know later!!???
I’m sorry to hear that the dough was difficult to work with. I didn’t find that to be the case when I was creating the recipe. I would encourage you to measure by weight and not volume for consistent results!