Sourdough Sandwich Bread
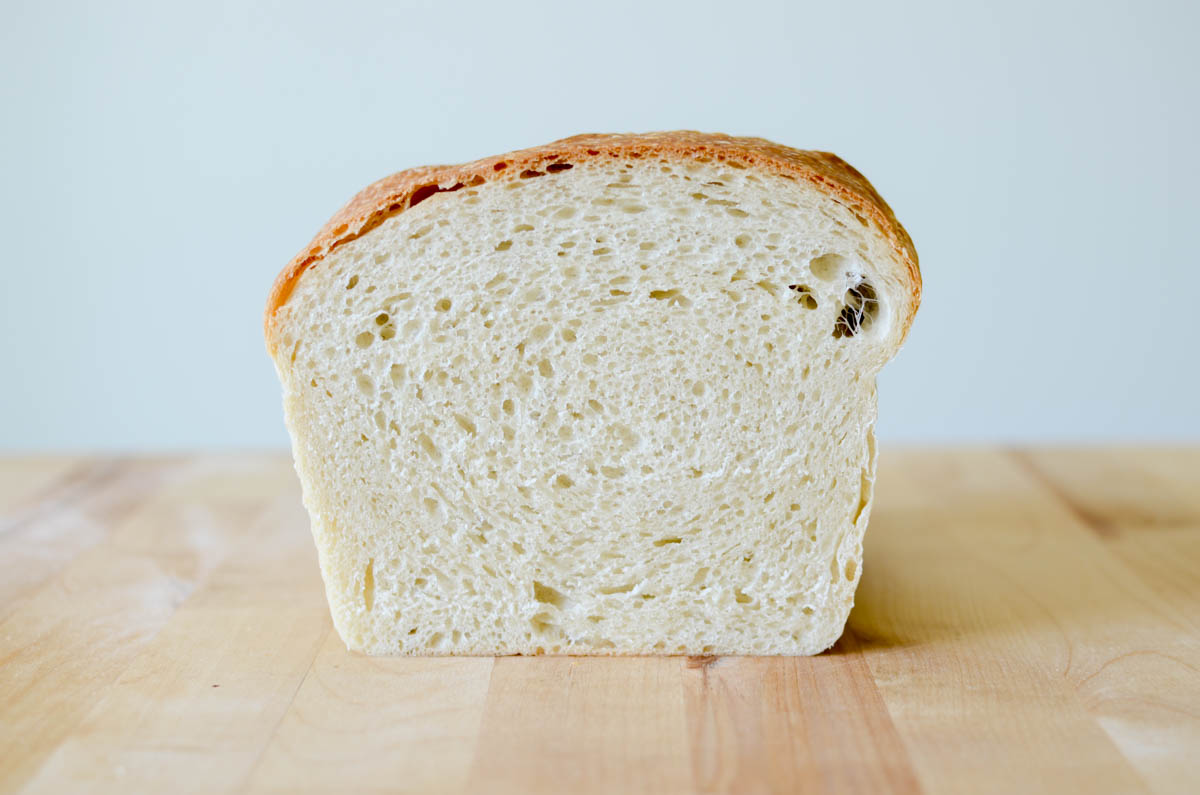
This sourdough sandwich bread is soft and tender with a buttery flavor. Made from soft, airy sandwich dough made with 100% sourdough starter, it’s sure to be a household favorite!
This post may contain affiliate links. As an Amazon Associate, I may receive a small commission, at no cost to you, if you make a purchase. Please read our disclosure policy.
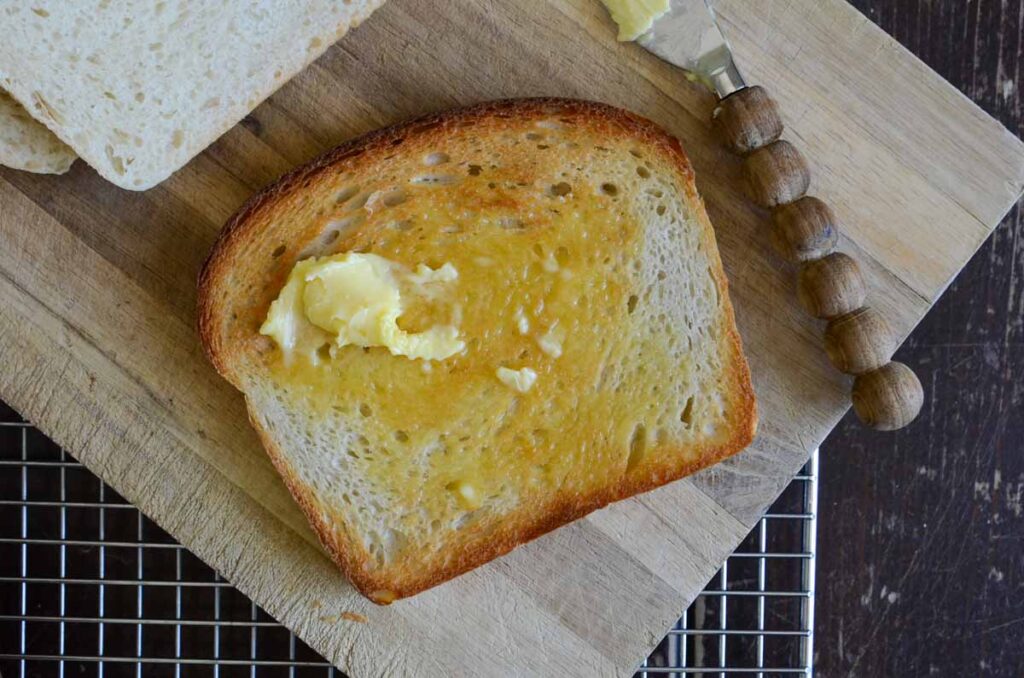
Sandwich bread is where I started, all those years ago as a young mom with long afternoons spent at home with my kids. Thick pieces of fresh bread, slathered in butter and mixed berry rhubarb jam, are a favorite memory of my kids, even as adults! There’s nothing that will bring people together like a fresh loaf of homemade bread!
Sourdough Sandwich Bread vs Sourdough Bread
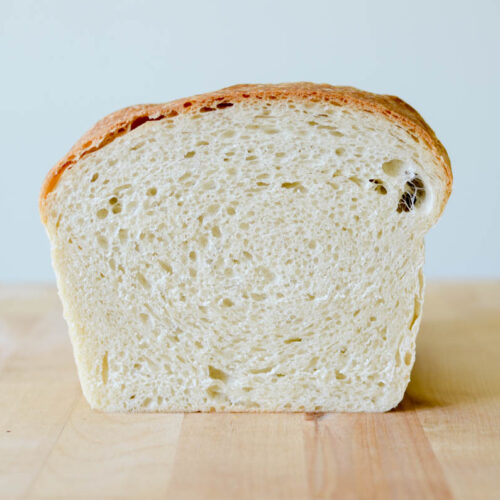
What is sourdough sandwich bread, and how is it different than a traditional loaf of sourdough bread? A sourdough sandwich bread has a tight crumb and is baked in a loaf pan for a traditional shaped loaf. Enriched with a bit of butter makes the sandwich bread soft and tender with a delicious buttery flavor.
I stopped buying bread from the store long ago and have been faithfully making my easy sourdough bread recipe weekly. While it creates a perfectly delicious bread, sometimes you want a piece without a thick and chewy crust. After a bit of trial and error, I created this simple step-by-step sourdough sandwich bread for beginners as a great way to jump into sourdough sandwich bread.
Why You’ll Love Sourdough Sandwich Bread
- Easy – Make a delicious sourdough sandwich bread with a soft crust with just 6 ingredients.
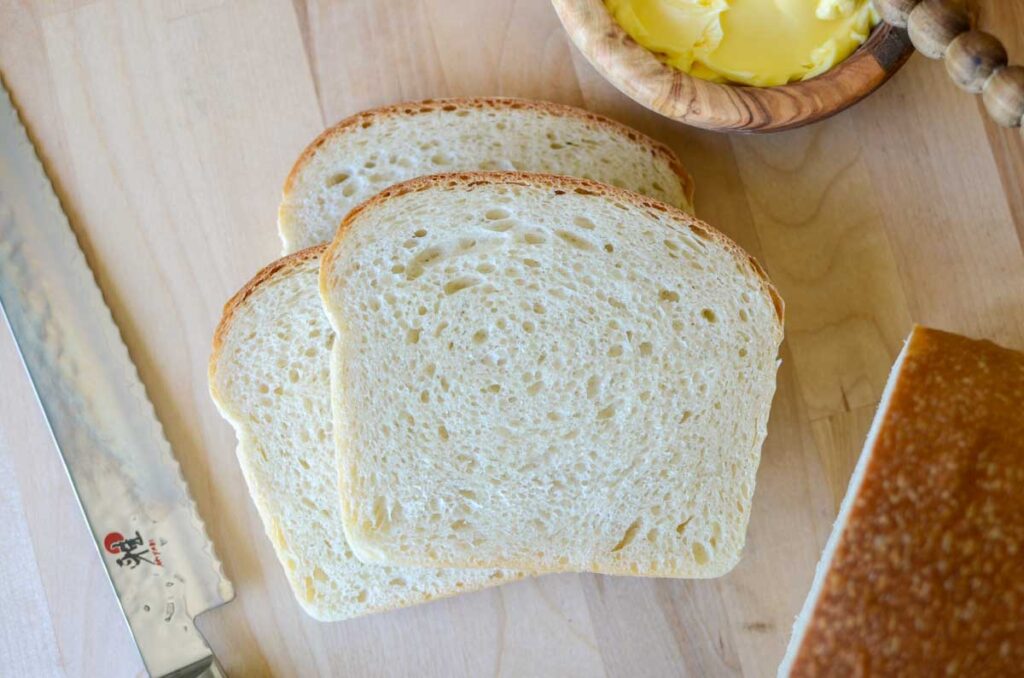
- Multiple uses – Sourdough sandwich bread is the perfect sandwich bread to enjoy in a variety of ways. Use slices of fluffy sourdough sandwich bread and transform them into French toast for a cozy weekend breakfast, make a perfect grilled cheese sandwich for a quick lunch, or simply spread them with peanut butter and jam. There’s no end to how you can enjoy it!
- Soft – Enriched doughs contain butter, sugar, and sometimes eggs and milk to create a silky smooth and soft dough. These types of doughs are a joy to work with, and I love how they feel in my hands as I stretch and fold it.
New to sourdough? If you’re new to baking with a sourdough starter, learn how to make a sourdough starter from scratch.
Equipment
- 9×5 inch loaf pan
- Stand mixer
- Kitchen scale
- Parchment paper (optional)

Ingredients
- Sourdough starter – Use an active sourdough starter that’s risen properly and is full of bubbles to create a levain. Alternatively, if you refresh your sourdough starter regularly, you can use that in place of the levain.
- Water – I use warm water in the cooler months, and cooler water in the peak of summer to help regulate the bulk ferment.
- Honey – Just a touch of honey helps make for a soft sourdough sandwich bread loaf.
- Salt – Flavors the bread
- Flour – Use a strong bread flour to provide the strength to develop enough gluten for a tall loaf. However, don’t let not having bread flour stop you from making bread as all-purpose flour will yield a beautiful loaf of bread, just not as tall.
- Butter – Butter helps make the bread soft and gives it the yummiest buttery flavor. Cube unsalted butter and allow it to soften to room temperature.
How to Make Sourdough Sandwich Bread
Levain
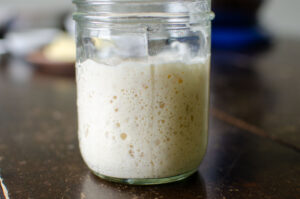
1:1:1 Levain: This recipe calls for a levain mixed the night before you mix the dough. Combine 45 g sourdough starter, 45 g warm water, and 45 g bread flour in a small bowl. Cover and let it sit at room temperature for 8 hours.
The levain is ready when it has doubled in size, has lots of bubbles, and a slightly sour aroma.
Do you have to use a levain in this recipe? No, but if you have a well-maintained and frequently refreshed starter, you can substitute 125 g of active sourdough starter for the levain in the recipe.

Mix the Dough
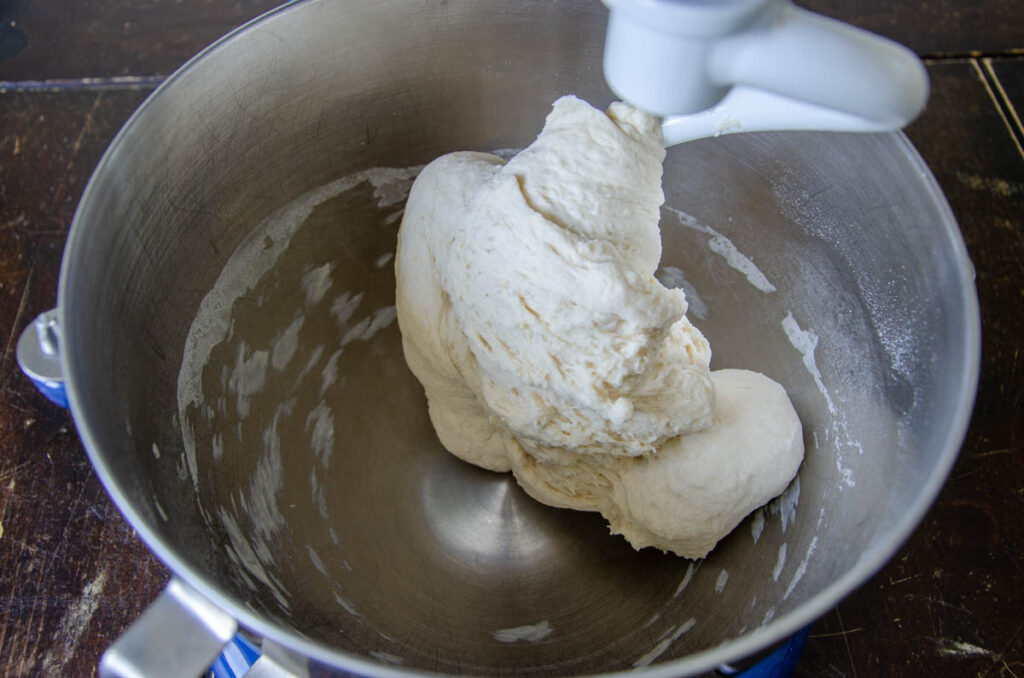
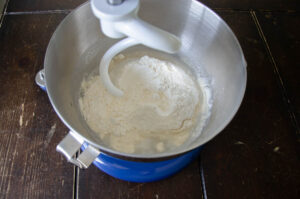
Once your levain has doubled in size, combine all of the ripe levain with 25 g (2 tbsp) honey, 250 g (1 cup) water, 500 g (4 cups) bread flour, and 11 g ( 2 tsp) salt in the bowl of a stand mixer.
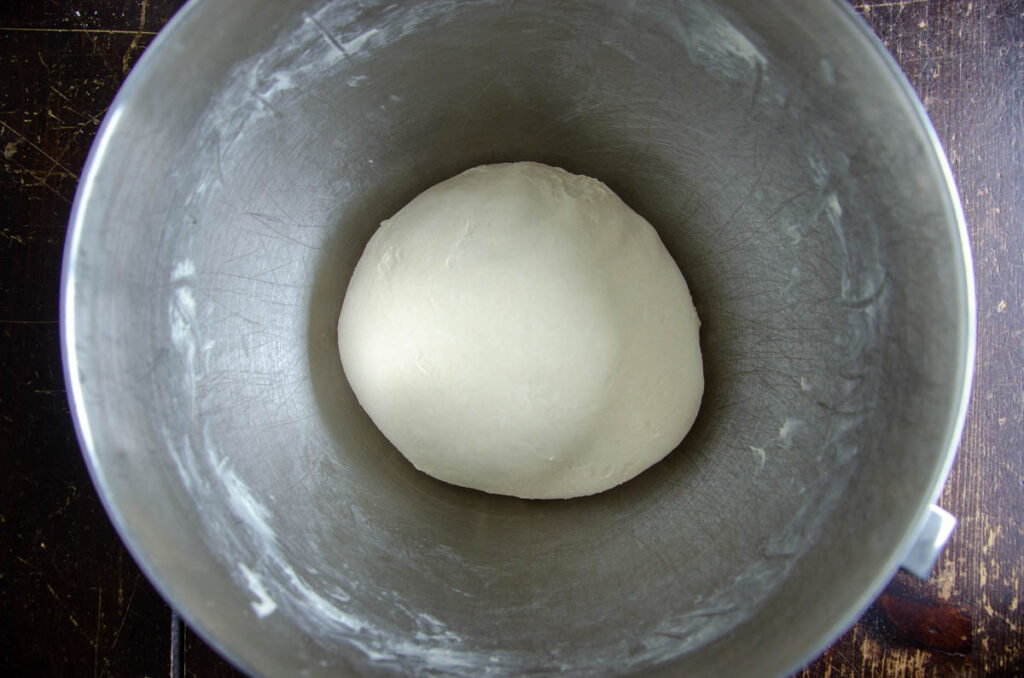
Mix on low speed with a dough hook attachment for 4-5 minutes. The dough will come together and pull away from the sides of the bowl to form a cohesive ball.

Autolyse
Cover the bowl and let the dough rest for 30 minutes. I leave the bowl in the stand mixer and drape a tea towel over the mixing bowl and around the dough hook attachment.
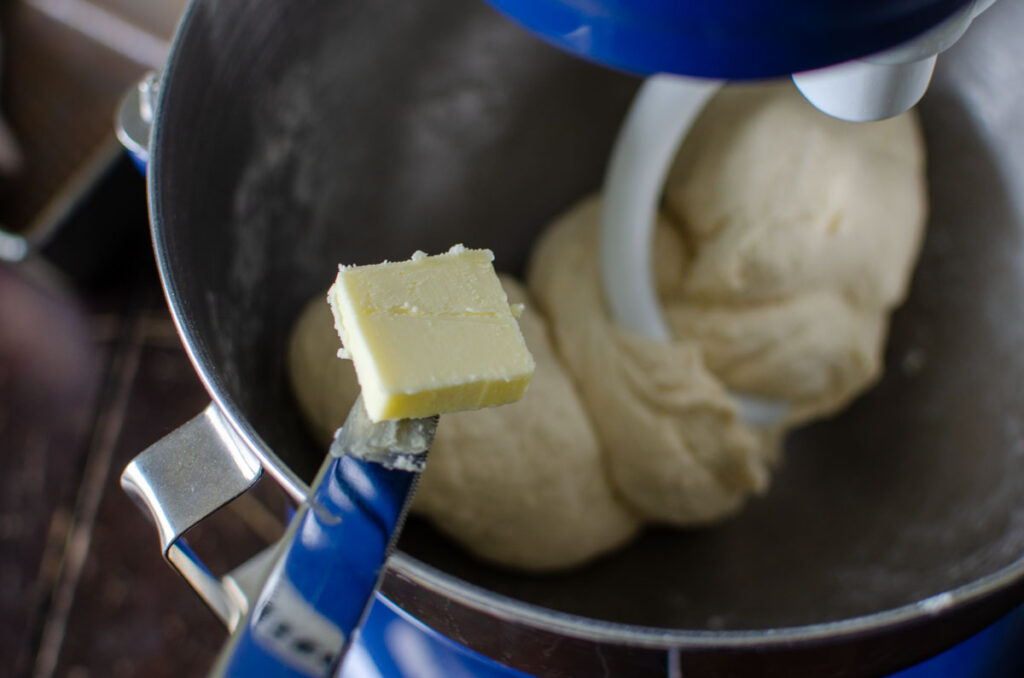
Prepare 85 g (6 tbsp) butter by cutting it into 1/4-inch-thick pats and place them on a dish to warm to room temperature.
Incorporate the Butter
Check that the butter is at room temperature. Press on a pat of butter with your finger, it should be easy to indent without being mushy or melted.
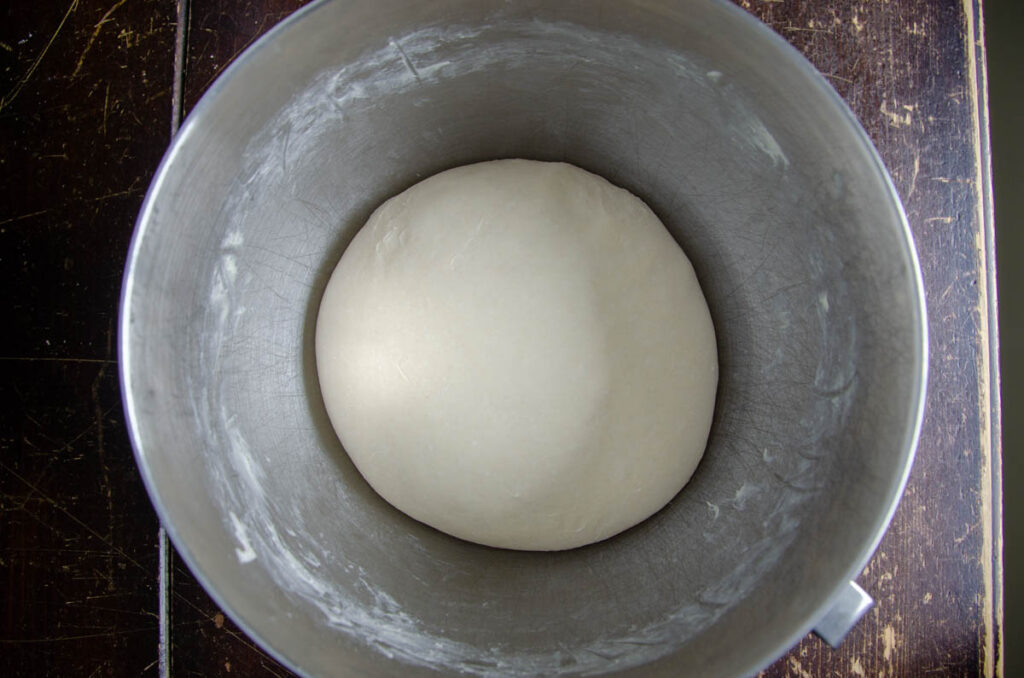
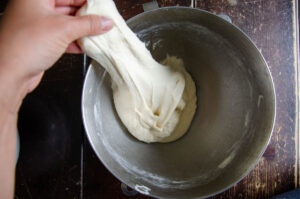
Remove the towel from the bowl. With the mixer on low speed, add a pat of butter to the dough, one at a time, until it’s completely incorporated into the bread dough before adding more. Continue with the remaining pats of butter. This process should take 6-8 minutes.
Initially, the dough will look slightly shaggy. After you add all of the butter, the dough will be smooth, silky, and have a light shine.
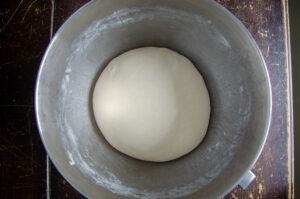
Strengthen the Dough and Bulk Ferment | First Rise
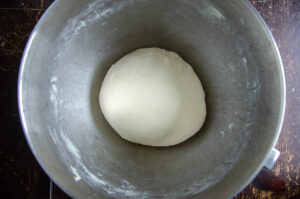
Cover the bowl and place it in a warm place to let the dough rise. For the first 90 minutes of the bulk fermentation, do a series of stretch and folds every 30 minutes for a total of 3 sets.
With wet hands, grab one side of the dough and lift it straight up and over to the other side. Rotate the bowl a quarter of a turn and stretch and fold that side. Continue working your way around the bowl until the dough feels resistant. By the last set of stretch and folds the dough will be smooth, stretchy, and won’t stick to your hands.
After the last set of stretch and folds, cover the bowl and let the dough rest for the remainder of the bulk ferment. The dough took about 5 hours at 72°F/22°C.
The dough is done bulk fermenting when it has risen significantly with small bubbles beneath the surface. Also, where the dough meets the edge of the bowl will be domed downward.
Optional Cold Ferment: After the bulk fermentation is done, cover the bowl and refrigerate overnight. The next morning, continue with shaping the dough, letting it proof, and bake as directed.

The exact amount of time this takes largely depends on the temperature of your kitchen. If the air temperature is warmer, the dough will ferment faster. However, if the air temperature is cooler, the dough takes longer to finish bulk fermenting.
Shape
Grease a 9×5 bread pan with butter or line it with a piece of parchment paper.
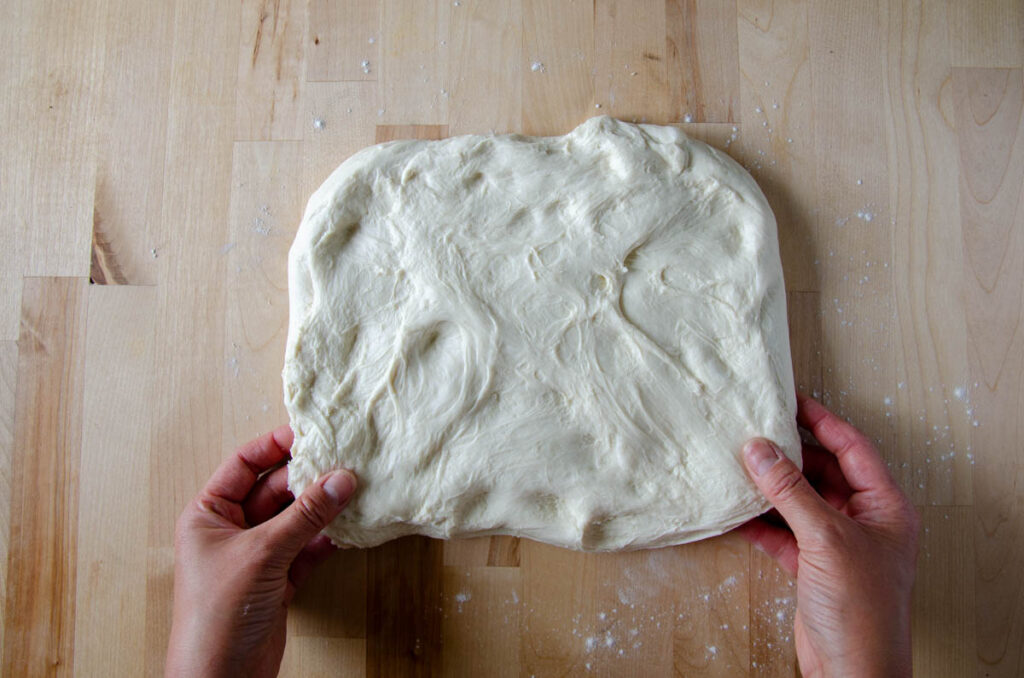
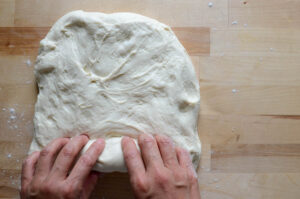
Using a bowl scraper or silicone spatula, gently scrape the dough onto a clean work surface. Roll out the dough into a rectangle 8″x 10″ to help flatten out some of the air bubbles. The dough should be easy to handle and not stick to the counter. If you find that the dough is sticking, gently lift the dough and dust the counter underneath with a bit of flour.


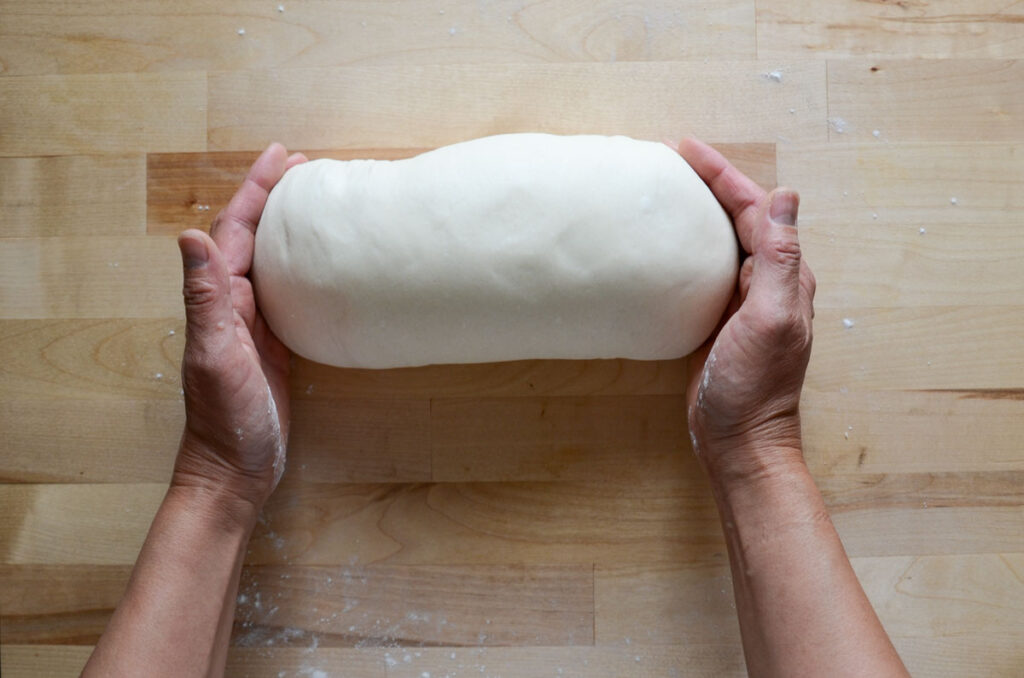
Starting at the short side of the dough, roll the dough into a long cylinder.
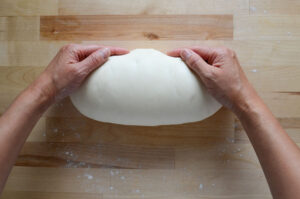
Tuck the ends of the bread dough under. With both hands cupping the far end of the dough, pull the bread dough towards yourself, creating a bit of surface tenion on the top of the bread dough. Lift the dough with both hands into the oiled loaf pan.


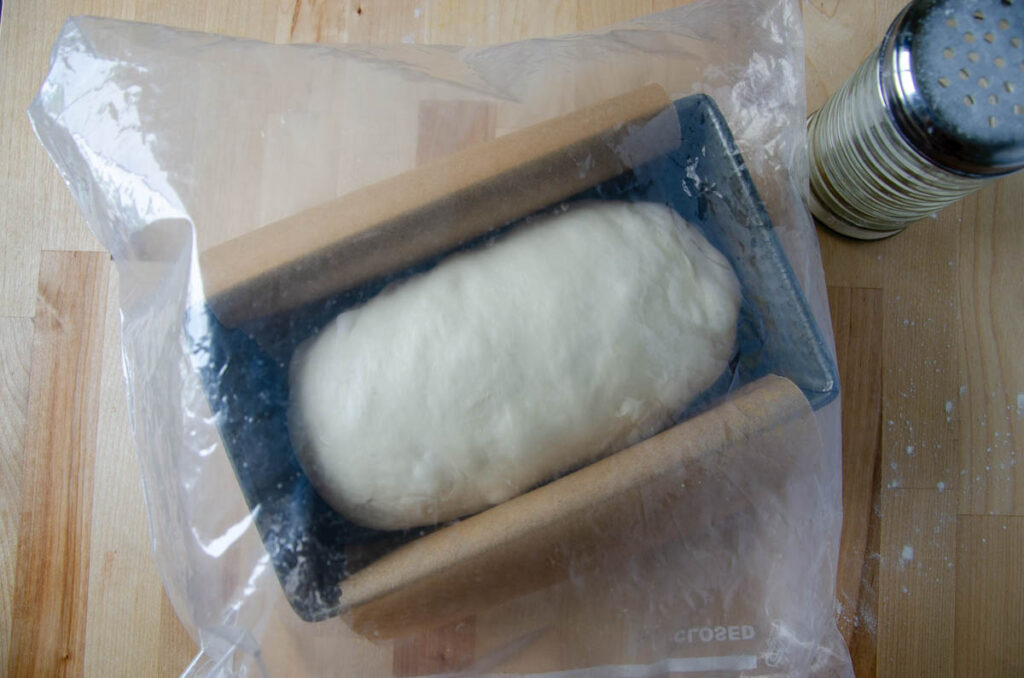
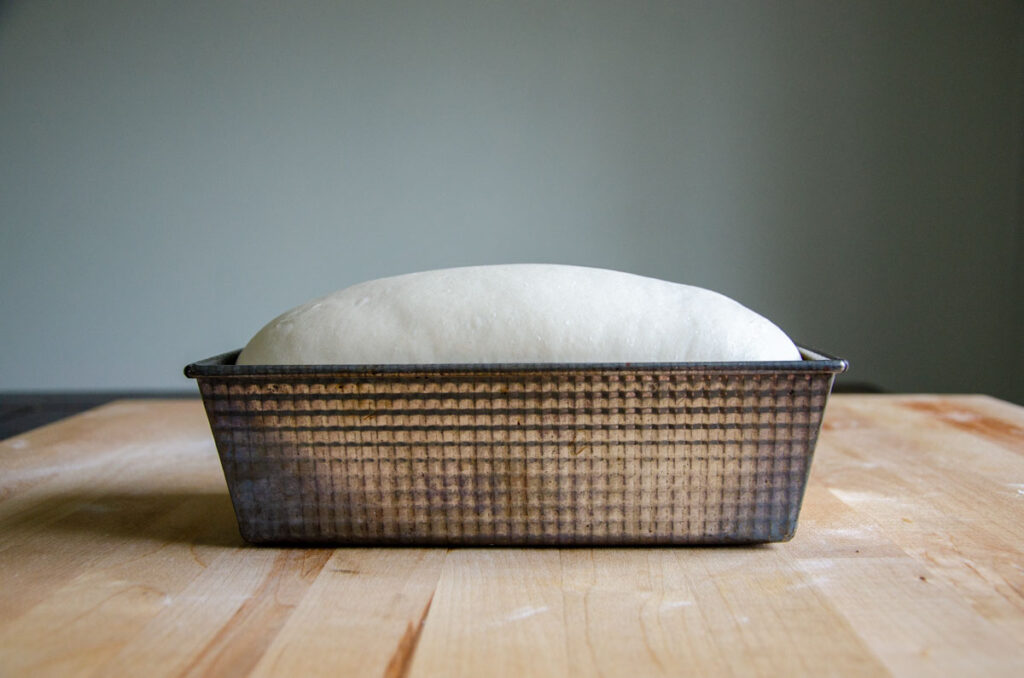
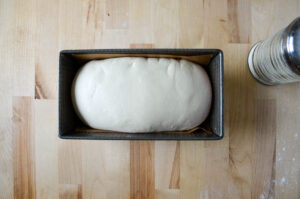
Proof | Second Rise
Place the pan into a large plastic bag, seal it, and set it in a warm place for its second rise. Let the dough proof until the dough is 1″ – 2″ above the rim of the pan.
Bake
When the bread is done proofing, preheat the oven to 375°F/190°C with the oven rack set in the middle position.
Place the bread pan into the preheated oven and bake for 45 minutes or until the sourdough sandwich bread internal temperature reaches 200°F/95°C with a digital thermometer and the top is a light golden brown color.
Store
Allow the bread to cool completely before placing it into an airtight container. Store at room temperature up to 4 days.

FAQs
Why is my sourdough sandwich bread dense?
To achieve a soft sandwich bread, the dough needs to be properly proofed. If your sourdough sandwich bread loaf is dense, it’s likely under-proofed and needs more time to proof in the bread pan.
Do not bake the dough until it has risen above the edge of the pan. It may take longer than you think – Be patient! If it’s not rising, place the bread in an oven with the light on. I’ve had some loaves take up to 8 hours to properly proof.
Do I need to use a stand mixer?
Nope, you can make this bread with a large bowl and knead it by hand. Add a pat of butter to the dough and spread it thinly over the dough with the heel of your hand before continuing to knead it in.
What size loaf pan should I use?
If you want an extra tall loaf, use a 8×4 bread loaf pan instead of a traditional 9×5 loaf pan. For perfectly straight sides, use a 9 x 4 Pullman loaf pan without the lid.
Tips
- If you have a large family like us, double the sourdough sandwich bread recipe and bake the two loaves at the same time. Freeze whatever you don’t eat to enjoy later. This loaf can be frozen whole, covered tightly in plastic wrap.
- I highly recommend using a stand mixer to mix the enriched dough, as it’s faster and less fuss. Incorporating the butter takes a bit more finesse if you choose to knead the dough by hand.
- For a glossy sheen to the loaf, brush the top of the loaf with a beaten egg before baking.
Sourdough Sandwich Bread
Want to Save This Recipe?
Enter your email & I’ll send it to your inbox. Plus, get great new recipes from me every week!
By submitting this form, you consent to receive emails from Lockrem Homestead
Equipment
- 9×5 bread loaf pan
- stand mixer with a dough hook attachment
- kitchen scale
Ingredients
Levain
- 42 grams ripe/mature starter
- 42 grams warm water
- 42 grams bread flour
Sourdough Sandwich Bread Dough
- Use all of the levain or substitute 125 g (½ cup) active sourdough starter
- 250 g water 1 cup
- 25 g honey 1 tbsp
- 11 g salt 2 tsps
- 500 g bread flour 4 cups
- 85 g unsalted butter 6 tbsp
Instructions
Levain
- This recipe calls for a levain mixed the night before you mix the dough. Combine 45 g sourdough starter, 45 g warm water, and 45 g bread flour in a small bowl. Cover and let it sit at room temperature for 8 hours. The levain is ready when it has doubled in size, has lots of bubbles, and a slightly sour aroma.

Mix the Dough
- Once your levain has doubled in size, combine all of the ripe levain with 25 g (2 tbsp) honey, 250 g (1 cup) water, 500 g (4 cups) bread flour, and 11 g ( 2 tsp) salt in the bowl of a stand mixer.
- Mix on low speed with a dough hook attachment for 4-5 minutes. The dough will come together and pull away from the sides of the bowl to form a cohesive ball.

Autolyse
- Cover the bowl and let the dough rest for 30 minutes. I leave the bowl in the stand and drape a tea towel over the mixing bowl and around the dough hook attachment.
- Prepare 85 g (6 tbsp) butter by cutting it into ¼-inch-thick pats and place them on a dish to warm to room temperature.
Incorporate the Butter
- Check that the butter is at room temperature. Press on a pat of butter with your finger, it should be easy to indent without being mushy or melted.
- Remove the towel from the bowl. With the mixer on low speed, add a pat of butter to the dough, one at a time, until it’s completely incorporated into the bread dough. Continue with the remaining pats of butter. This process should take 6-8 minutes.
- Initially, the dough will look slightly shaggy. After you add the butter, the dough will be smooth, silky, and have a light shine.

Strengthen the Dough and Bulk Ferment | First Rise
- Cover the bowl and place it in a warm place to let the dough rise. For the first 90 minutes of the bulk fermentation, do a series of stretch and folds every 30 minutes for a total of 3 sets.
- With wet hands, grab one side of the dough and lift it straight up and over to the other side. Rotate the bowl a quarter of a turn and stretch and fold that side. Continue working your way around the bowl until the dough feels resistant. By the last set of stretch and folds, the dough will be smooth, stretchy, and won't stick to your hands.
- After the last set of stretch and folds, cover the bowl and let the dough rest for the remainder of the bulk ferment. The dough took about 5 hours at 72°F/22°C.
- The dough is done bulk fermenting when it has risen significantly with small bubbles beneath the surface. Also, where the dough meets the edge of the bowl will be domed downward.
- Optional Cold Ferment: After the bulk fermentation is done, cover the bowl and refrigerate overnight. The next morning, continue with shaping the dough, letting it proof, and bake as directed.
Shape
- Grease a 9×5 bread pan with butter or line it with a piece of parchment paper.
- Using a bowl scraper or silicone spatula, gently scrape the dough onto a clean work surface. Roll out the dough into a rectangle 8"x 10" to help flatten out some of the air bubbles. The dough should be easy to handle and not stick to the counter. If you find that the dough is sticking, gently lift the dough and dust the counter underneath with a bit of flour.
- Starting at the short side of the dough, roll the dough into a long cylinder.
- Tuck the ends of the bread dough under. With both hands cupping the far end of the dough, pull the bread dough towards yourself, creating a bit of surface tension on the top of the bread dough. Lift the dough with both hands into the oiled loaf pan.
Proof | Second Rise
- Place the pan into a large plastic bag, seal it, and set it in a warm place for its second rise. Let the dough proof until the dough is 1" – 2" above the rim of the pan.

Bake
- When the bread is done proofing, preheat the oven to 375°F/190°C with the oven rack set in the middle position.
- Place the bread pan into the preheated oven and bake for 45 minutes or until the sourdough sandwich bread internal temperature reaches 200°F/95°C with a digital thermometer and the top is a light golden brown color.

Store
- Allow the bread to cool completely before placing it into an airtight container. Store at room temperature up to 4 days.
I made this bread recipe and we loved it. I had some buttermilk to use up, so I substituted it for the water. I cold proofed it also and it has that amazing sourdough tang! Thank you for sharing the recipe with us!
I’m so glad you made it and enjoyed it!