Sourdough Buttermilk Biscuits
Sourdough buttermilk biscuits are a delicious twist on the classic recipe, made with simple, everyday ingredients. Using sourdough discard adds incredible flavor and is a great way to make use of extra starter. With the right technique, you’ll get mile-high biscuits that are soft and tender on the inside with beautifully crisp, golden edges. These buttermilk biscuits with sourdough discard are the ultimate comfort food!

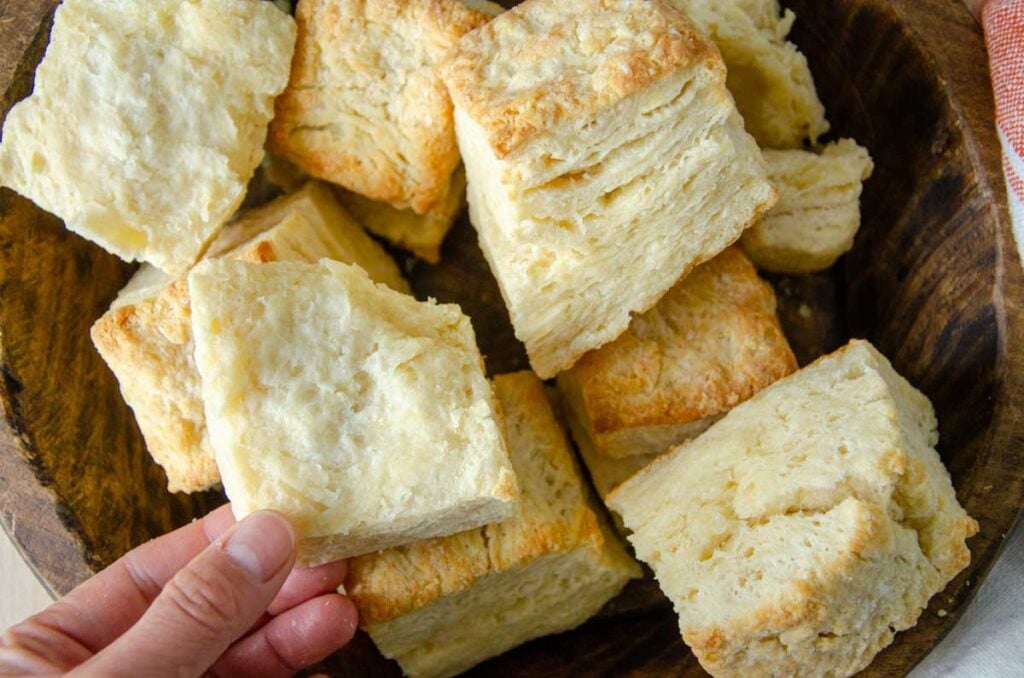
Is there anything better than a warm biscuit fresh from the oven? If there is, I haven’t found it yet. With their buttery, flaky layers that melt in your mouth, I can’t think of a single reason not to make these!
A great homemade sourdough biscuit recipe is a must in every kitchen, and this one delivers every time. Tall golden brown biscuits bake up with a rich buttery flavor that keeps everyone coming back for more. Sourdough discard biscuits with buttermilk are the ultimate comfort food—simple to make, yet capable of elevating any meal. Just a few wholesome ingredients come together to create something truly special.
And if you’d like to make classic buttermilk biscuits without sourdough starter, be sure to check out my traditional Buttermilk Biscuits recipe!
Troubleshooting Tall Sourdough Buttermilk Biscuits
Imagine…tall, buttery biscuits full of layers that melt in your mouth. Crispy and golden brown on the outside, but soft and tender on the inside. This was the biscuit I was determined to bake. After all, how hard could it be?
I tested this sourdough discard biscuit recipe multiple times before finding the process that yielded the biscuit that I was hoping for.
The first batch I made was simple and took very little time. I shaped the dough into a rectangle and cut out my squares.
Tasting them hot from the oven, they had a lovely buttery flavor and tender texture. I knew the recipe was correct, but I wasn’t pleased with how they looked, so I needed to tweak the shaping process. While there were a few layers, they didn’t have the height I was hoping for.

For the next batch, I shaped the dough into a rectangle and cut the dough into thirds before stacking. The pieces were uneven and a bit sloppy-looking. I pressed the stacked pieces of dough to about 1 inch thick before repeating the process 2 more times before the final cutting, leaving the outside edges as they were.


Looking at the biscuits after taking them out of the oven, they had layers and were taller than the first batch. However, they had toppled over. The uneven edges and sloppy stacking had resulted in creating tipsy biscuits. But they still tasted great.

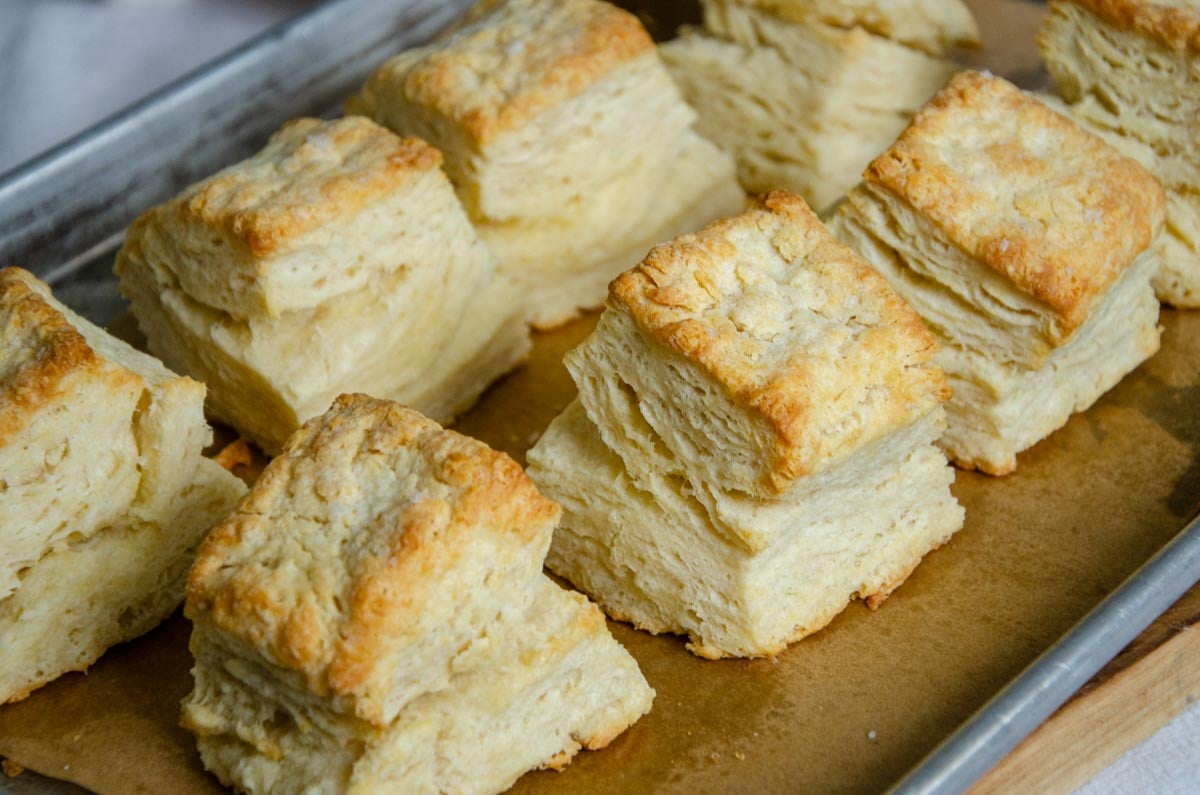
The final batch proved successful. I remedied all of the issues from the previous batches. As I shaped the dough, I used the bench scraper to create corners, making the dough even for stacking. I also trimmed the outside edges of the dough so that all sides of each biscuit would have a sharp, uniform cut.


Pulling them from the oven, I knew these were the perfect biscuits! They had the height I was working towards and plenty of layers to peel apart as you eat them, which is exactly what I was wanting!


Homemade Sourdough Biscuits Tips
- Be sure your leaveners are fresh and blend them into the flour completely.
- Chilling the unbaked biscuits in the freezer before they bake helps prevent all of the butter from leaking as they bake.
- Thick biscuit dough will help create tall biscuits. Flattening the dough as evenly as possible when you laminate the dough helps the biscuits from toppling as they bake. Cut all sides of the biscuits if cutting into squares.
- For tender biscuits, mix the dough just enough until it comes together to keep the gluten from developing. Like pie dough, sourdough biscuit dough is mixed only until just combined, then stacked to create flaky layers—much like laminating pastry dough. The result is tender, flaky sourdough biscuits that practically melt in your mouth.
FAQs
Can You Freeze Sourdough Discard Biscuits?
Yes! Freezing biscuits is such a great way to have them ready when you’re short on time. I like to double or even triple the recipe if I have extra buttermilk or sourdough discard to use up.
To freeze biscuit dough, just prepare it as directed, then place the unbaked biscuits on a baking sheet and freeze until solid. Once they’re frozen, transfer them to a freezer bag labeled with the name and date. When you’re ready to bake, pop the frozen biscuits onto a baking sheet and bake as directed—no need to thaw first!
You can also freeze baked biscuits. Let them cool completely, then store them in a freezer-safe container or plastic bag, squeezing out as much air as possible. Label with the name and date, and stash them in the freezer. For the best flavor and texture, enjoy within 2 months.
Do I Have to Use a Biscuit Cutter?
Biscuits are traditionally cut into circles or squares. If you prefer round biscuits but don’t have a round biscuit cutter, no worries—just use a cookie cutter, the rim of a glass, or even the top of a mason jar.
If you’d rather keep things simple, cut the dough into squares instead. A sharp knife does the trick, and you’ll use up every bit of dough—no scraps to re-roll!
Can I Make Sourdough Biscuits Without Buttermilk?
This recipe for sourdough buttermilk biscuits uses a handful of simple ingredients you probably already have in your kitchen. But if you’re out of real buttermilk, don’t worry—it’s easy to make a homemade buttermilk substitute! Just add 2 tablespoons of acid (such as white vinegar or lemon juice) to 1 cup of whole milk, stir, and let it sit for about 10 minutes before using. I recommend using white vinegar, since lemon juice can sometimes leave a hint of lemon flavor in the biscuits.
Another great (though less common) option is to mix 1 cup of sour cream with 1 cup of whole milk to replace the buttermilk. This combination is thick, creamy, and very similar to store-bought buttermilk in both taste and texture.
How to Bake Tall Biscuits?
There are a few key elements that make truly great flaky biscuits: a rich, buttery flavor, a soft and tender interior with flaky layers, and—my personal favorite—impressive height. I want a tall biscuit!
The secret to achieving those perfect buttermilk biscuits with sourdough starter begins with cold ingredients. When the small pieces of butter hit the heat of the oven, the water in the butter turns to steam, creating those irresistible flaky layers and a light, tender texture.
Laminating the dough creates layers that puff up while baking.
Next, be mindful when cutting your biscuits. Use a sharp biscuit cutter or knife to make clean cuts through the dough. Avoid twisting the cutter, as that seals the edges and prevents your biscuits from rising tall. If you’re cutting square biscuits with a knife, be sure to slice straight down on all sides so they bake evenly and stay upright in the oven.
Ingredients
Making sourdough homemade biscuits is a great way to use up extra starter and give them a lovely, complex flavor. Be sure to use freshly fed discard for a subtle, tangy flavor. Although this sourdough buttermilk biscuits recipe calls for sourdough discard, you can use active sourdough starter. Be sure to measure by weight and not volume since active starter contains more air.
Overview of How to Make Sourdough Discard Buttermilk Biscuits
1. Whisk together the dry ingredients and incorporate the grated butter using a pastry blender or your fingers.

2. Mix the wet ingredients until they’re blended and combine with the dry ingredients.

3. Turn out the dough onto a clean work surface and shape it into a rectangle.

4. Begin the lamination. Cut the dough into thirds and stack before rolling out again. Repeat 2 more times.

5. After the final rollout, cut biscuits into 8 equal-sized squares, place them onto a sheet pan, and freeze for 15 minutes.

6. Brush the tops of the biscuits with melted butter and sprinkle with coarse salt.

7. Bake the biscuits for 18-20 minutes at 425°F/220°C until they’re golden brown.
8. Allow the biscuits to cool completely before storing in an airtight container at room temperature.

Ways to Serve Buttermilk Sourdough Discard Biscuits
- Enjoy easy sourdough discard biscuits and gravy
- Use sourdough discard biscuits for strawberry shortcake
- Serve as a simple side for soups or salads


Sourdough Buttermilk Biscuits
Want to Save This Recipe?
Enter your email & I’ll send it to your inbox. Plus, get great new recipes from me every week!
By submitting this form, you consent to receive emails from Lockrem Homestead
Equipment
- pastry cutter
- large bowl
- kitchen scale
- measuring spoons
- box grater
- parchment paper optional
- Baking Sheet
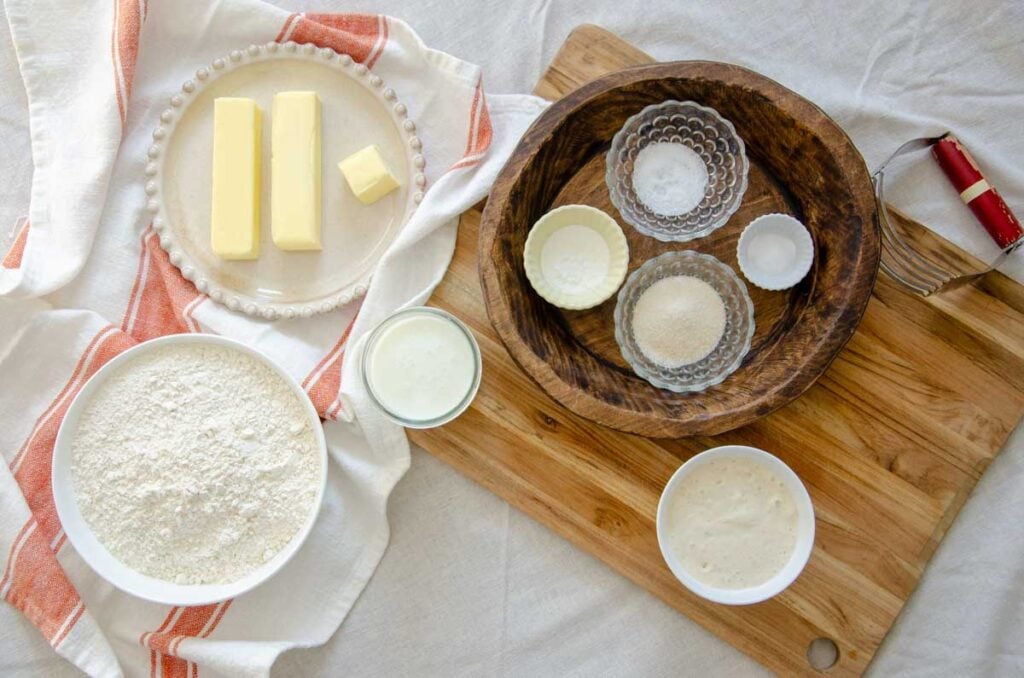
Ingredients
- 500 g all-purpose flour 4 cups
- 1 tsp sea salt
- 1½ tbsp baking powder
- ¼ tsp baking soda
- 2 tbsp sugar
- 226 g unsalted butter 1 cup
- 28 g unsalted butter 2 T
- 125 g sourdough discard ½ cup
- 313 g buttermilk 1¼ cup
- 1 tbsp flaky salt, like Maldon Sea Salt Flakes optional
Instructions
Prepare the Dough
- Grate cold butter using a box grater or cube the butter into small chunks with a knife and set aside.226 g unsalted butter
- Next, add the flour, salt, baking soda, sugar, and baking powder to a large mixing bowl. Whisk together thoroughly to distribute the leaveners throughout the flour.500 g all-purpose flour, 1 tsp sea salt, ¼ tsp baking soda, 2 tbsp sugar, and 1½ tbsp baking powder
- Add the grated butter to the dry ingredients and blend using a pastry cutter until the mixture resembles coarse sand. If you don’t have a pastry cutter, then use your fingers to incorporate the butter. As you sift through the flour with your fingers, press the butter between your fingers so the butter coats the flour.
- In a separate bowl, whisk the sourdough discard with the buttermilk until it's smooth.125 g sourdough discard and 313 g buttermilk
- Pour the wet ingredients into the flour mixture. Using a lifting motion with a spoon, gently mix the flour into the buttermilk mixture until it forms a shaggy dough. Once all of the buttermilk mixture is mixed into the dry ingredients, knead the dough 3-5 times with your hands to incorporate the last of the dry ingredients.
Create the Flaky Layers (Lamination)
- Turn the dough out onto a clean work surface. Shape the dough into a thick rectangle, roughly 8×10 inches. Use a bench scraper to help square the corners.
- To laminate the dough, first cut the dough in half and stack the layers. Using your fingers, flatten the dough until it's 1½ inches thick. Next, cut the dough into 3 equal pieces. Repeat stacking them and flattening them as evenly as possible until they're 1 ½ inches thick. Repeat this process 2 more times.
Cut
- After the final lamination, cut biscuits into 8 equal-sized squares using a sharp knife or bench scraper. Trim off the outside edges of each biscuit. Avoid any twisting motion when cutting to preserve the layers.
Freeze and Bake
- Arrange biscuits ½ inch apart on a parchment-lined baking sheet.
- Place the biscuits into the freezer for 15 minutes while the oven preheats to 425°F/220°C.
- Remove the biscuits from the freezer and brush melted butter onto the tops of the biscuits using a pastry brush. If desired, sprinkle a bit of coarse salt over the tops.28 g unsalted butter and 1 tbsp flaky salt, like Maldon Sea Salt Flakes
- Bake for 18-20 minutes, or until the tops are golden brown and reach an internal temperature of 190°F/88°C.
- Cool the biscuits on a wire cooling rack.
Storage
- Flaky sourdough buttermilk biscuits are best the day they’re baked, but store really well. Allow them to cool completely before placing them into an airtight container. Store at room temperature for up to 3 days.
Wintertime is soup time at the Lockrem house, and biscuits like these are perfect for soaking up the leftover broth at the bottom of the bowl. Whether you’re enjoying them for dessert with whip cream and strawberries, or dunking them in gravy, these biscuits are a treat! Let me know how you enjoyed them, or leave your questions below!