The Best Peach Pie Recipe
Introducing…the best peach pie recipe! It’s simple to make and delivers big flavors every time. Juicy peach slices are mixed with a hint of cinnamon before baking in a flaky pie crust topped with turbinado sugar. You can make with fresh peaches or the canned peaches in your pantry!

There are so many delicious things to make with them! This last month, I’ve been enjoying peach salsa, peach cobbler, peach galette, and peach crisp in addition to all the fresh peaches I can eat throughout the day. Seriously, they’re so good! But my personal favorite is this homemade peach pie recipe! It’s especially delightful topped with a big scoop of vanilla ice cream. It tastes like summer!
Why You’ll Love Peach Pie
- It’s made with whole, simple ingredients and is big on flavor. Sweet, juicy peaches and a hint of cinnamon to warm them up, all baked in a flaky crust. Simply delightful!
- This pie has the perfect filling that sets up rather than oozes out!
- You can use fresh or canned peaches, so you can make this pie any time of the year.
Peach Pie Ingredients

Pie Crust Ingredients
- Pie crust – I’ll always encourage you to make a homemade pie crust like my sourdough pie crust.
Filling Ingredients
- Peaches – Fresh peaches at the height of peach season are my first choice and will have the best flavor. However, if they’re not in season, you can use canned peaches too.
- Sugar – Use granulated or cane sugar to sweeten the fruit filling and help draw out the juices in the peaches.
- Flour and Tapioca starch – Just a bit of flour and tapioca starch thickens the peach pie filling so it sets up perfectly. No runny pie here!
- Lemon – Add fresh lemon juice to the filling to enhance the peach flavor. Also, the acid in the juice reduces oxidation in the peaches. If you don’t have fresh lemon juice, use bottled lemon juice instead.
- Cinnamon – Adds a touch of warmth to the pie filling.
- Butter – The secret ingredient that makes the pie filling rich, without feeling heavy.
Egg Wash
- Egg – Adds shine and helps make the pie crust golden brown as it bakes.
- Milk – Just a touch to help thin out the egg, making it easier to brush on the crust.
- Coarse sugar – Use turbinado sugar or Demerara sugar to add a crunchy texture to the pie.
Equipment
- 9″ Pie dish
- Rolling pin
- Large bowl
- Pastry belnder or food processor
- Peeler/knife
- Cooling rack
How to make Peach Pie
Prep
Preheat the oven temperature to 425°F/218°C with the rack in the center of the oven.
Prepare the pie crust, shape it into a disc 1′ thick, and wrap it in a piece of plastic wrap. Place in the fridge and chill for 1 hour.
Prepare the Filling
Add sugar, tapioca starch, flour, and cinnamon to a large bowl and stir to combine the ingredients.
Peel the peaches with a peeler, remove the pit, and then slice each half into ½ pieces. Add the peach slices to the dry ingredients along with 1 tbsp of fresh lemon juice. Stir gently until the peaches are coated with the flour and sugar mixture. Set aside while you roll out the crust to let the tapioca starch absorb the peach juices.


TIP: Blanching the peaches makes quick work of removing the skins from the peaches. Heat water in a small saucepan until it’s simmering. Drop each peach into the water for 1 minute, rotating so that each side of the skin is in the water. Remove the peach and submerge in a bowl of ice water. The skins will slip right off!
Assemble
Remove the crust from the fridge and allow it to sit at room temperature for 10 minutes. On a floured work surface, roll out the bottom crust until it’s 12-13 inches in diameter. Place the pie dough in the bottom of a 9-inch pie plate, gently pressing the crust into the corners of the plate. With a paring knife, remove the extra crust 1 inch from the edge of the pie plate.
Spoon the pie filling into the crust. Next, add the cubed butter evenly over the top of the filling.
Roll out the top pie crust into a 12-inch diameter.


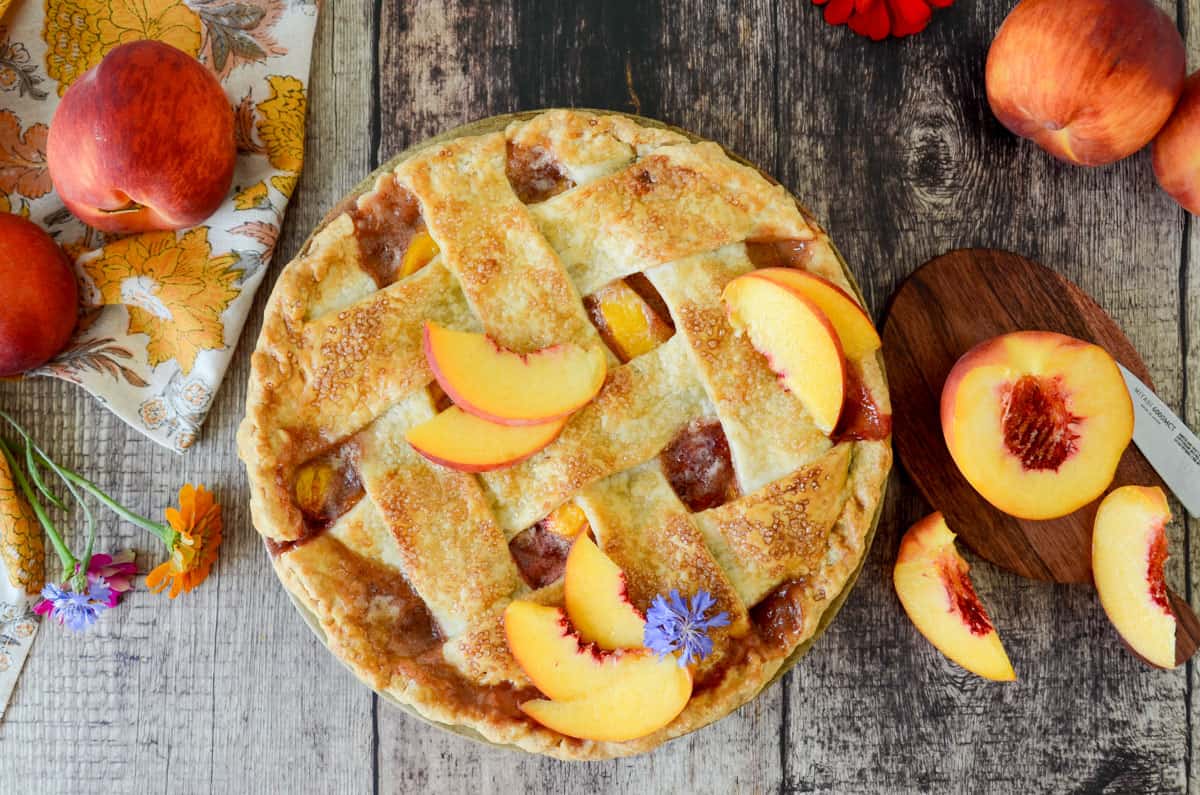
For a lattice crust, use a pizza cutter to cut the top crust into 6 2-inch strips. Weave the strips into a lattice pattern, using an over-under method, as pictured above. If you’re having a full crust, roll out the pie crust over the top of the pie. Be sure to add small slices, or vents, to keep your pie crust from becoming soggy!
Lift and crimp the edge of the pie dough, working your way around the pie plate.
Brush the egg wash over the top of the crust with a pastry brush and sprinkle with coarse sugar.
TIP: If you notice the edges of the crust getting too brown before the pie is done, add a pie shield or a piece of aluminum foil.


Bake
Add the pie to a baking sheet and bake for 20 minutes. Reduce the oven temperature to 375°F/190°C and bake for an additional 35-40 minutes.
The pie is done when the center of the peach filling reads 200°F/94°C with a digital thermometer, and the top is golden brown.

Remove the pie from the oven and place on a cooling rack.
Allow the pie to cool for 4 hours before cutting. The pie filling will set as it cools.
Tips
- All-purpose flour/tapioca starch is key to thickening the pie filling so you don’t have a gooey mess.
- There are two types of peaches, clingstone and freestone. I prefer free stone because they’re easier to work with.
- Don’t overfill the pie to avoid the pie filling from overflowing when baking.
- Let the pie cool completely before slicing to give the filling a chance to set.
- Use peaches that are ripe, but still firm. Overripe fruit is juicer and can become too soft when baking.
Serving Suggestions
- To avoid a runny pie filling, allow the pie to cool completely before slicing to give the flour and tapioca starch plenty of time to set properly.
- Top a slice of peach pie with a scoop of vanilla ice cream to enjoy à la mode.
- Add a dollop of whipped topping.
- Since pie was originally created as a breakfast food, there’s no reason to enjoy a slice with a cup of your morning coffee.

Storage
Cover the pie with a piece of plastic wrap or foil and store at room temperature. It is best to enjoy it within 2 days of baking. Refrigerate for longer storage and enjoy for up to 5 days!
To freeze the pie, allow it to cool completely and then wrap it tightly in 2 layers of plastic wrap. To thaw the pie, place it in the refrigerator overnight.
Easy Peach Pie FAQs
Can I Use Canned Peaches?
Yes! Drain 2 15.25 oz cans of peaches before adding to the sugar and flour mixture.
Do I Need to Peel the Peaches?
No, but I would suggest it. Baking a peach pie with the skins on will affect the texture of the pie filling.
Why is My Pie Runny?
There are two possible reasons for a runny filling. First, and easiest to correct, is that the pie is still too warm. The peach pie needs to cool completely to properly set up. Allow more time for the pie to cool, or place it in a fridge to cool quickly. The second reason is that there needs to be more flour and starch added to the filling. This can happen if you have extremely juicy peaches or if the peaches are a touch overripe.
More Recipes from Lockrem Homestead

I hope you love this peach pie as much as my family does! Be sure to leave a star rating and let me know how you serve your pie!

The Best Peach Pie Recipe
Want to Save This Recipe?
Enter your email & I’ll send it to your inbox. Plus, get great new recipes from me every week!
By submitting this form, you consent to receive emails from Lockrem Homestead
Equipment
- 1 9" pie plate
- 1 Rolling Pin
- large bowl
- peeler
- Knife
- kitchen thermometer
Ingredients
- 1 double pie crust
- 2 lbs fresh peaches 6-8 large peaches
- ⅔ cup sugar
- 2 tbsp all-purpose flour
- 2 tbsp tapioca starch
- 1 tbsp lemon juice
- 1 tsp cinnamon
- 2 tbsp unsalted butter room temperature, cubed
- 1 egg room temperature
- 1 tbsp whole milk room temperature
- 1 tbsp coarse sugar optional
Instructions
Prep
- Preheat the oven temperature to 425°F/218°C with the rack in the center of the oven.
- Prepare the pie crust, shape it into a disc 1 inch thick, and wrap it in a piece of plastic wrap. Place in the fridge and chill for 1 hour.
Prepare the Filling
- Add sugar, tapioca starch, flour, and cinnamon to a large bowl and stir to combine the ingredients.
- Peel the peaches with a peeler, remove the pit, and then slice each half into ½ pieces. Add the peach slices to the dry ingredients along with 1 tbsp of fresh lemon juice. Stir gently until the peaches are coated with the flour and sugar mixture. Set aside while you roll out the crust to let the tapioca starch absorb the peach juices.
Assemble the Pie
- Remove the crust from the fridge and allow it to sit at room temperature for 10 minutes. On a floured work surface, roll out the bottom crust until it’s 12-13 inches in diameter. Place the pie dough in the bottom of a 9-inch pie plate, gently pressing the crust into the corners of the plate. With a paring knife, remove the extra crust 1 inch from the edge of the pie plate.
- Spoon the pie filling into the crust. Next, add the cubed butter evenly over the top of the filling.
- Roll out the top pie crust into a 12-inch diameter.
- For a lattice crust, use a pizza cutter to cut the top crust into 6 2-inch strips. Weave the strips into a lattice pattern. If you’re having a full crust, roll out the pie crust over the top of the pie.
- Lift and crimp the edge of the pie dough, working your way around the pie plate.
- Brush the egg wash over the top of the crust with a pastry brush and sprinkle with coarse sugar.
Bake the Pie
- Add the pie to a baking sheet and bake for 20 minutes. Reduce the oven temperature to 375°F/190°C and bake for an additional 35-40 minutes.
- The pie is done when the center of the peach filling reads 200°F/94°C with a digital thermometer, and the top is golden brown.
- Remove the pie from the oven and place on a cooling rack.
- Allow the pie to cool for 4 hours before cutting. The pie filling will set as it cools.
This recipe reminds me of baking with my grandma, down to the lattice strips on top! I hope you enjoy the baking as much as the eating! Leave your questions and comments below, I look forward to hearing from you!