Seeded Multigrain Sourdough Bread Recipe
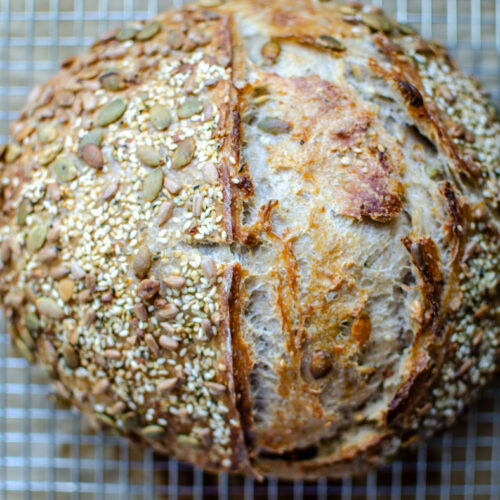
This seeded multigrain bread is full of whole grain goodness, long fermented benefits of sourdough with its signature tang, as well as the nutty, wholesome flavor from all of the seeds. Sesame, pumpkin, hemp hearts, and sunflower seeds are all woven throughout the loaf and roasted across the beautiful, crunchy crust.
Want to Save This Recipe?
Enter your email & I'll send it to your inbox. Plus, get great new recipes from me every week!
By submitting this form, you consent to receive emails from Lockrem Homestead
Equipment
- kitchen scale
- large mixing bowl
- 9" banneton
- Danish dough whisk
- lame
- parchment paper or dough sling
Ingredients
Levain
- 50 g active sourdough starter
- 50 g bread flour
- 50 g water
Seeded Multigrain Sourdough Bread Dough
- 350 g water 1½ cups
- 400 g bread flour 3 ¼ cups
- 100 g whole wheat flour ½ cup + 1 tsp
- 10 g salt 2 tsp
- all levain (you can substitute 125 g of active sourdough starter if it's healthy)
Seed Mix
- ¼ cup sunflower seeds
- ¼ cup pumpkin seeds
- 1 tbsp sesame seeds
- 1 tbsp hemp hearts
- additional seeds for the top of the bread exact amounts in the notes section at the bottom of the recipe card.
Instructions
Create the Levain
- Add 50 g each of sourdough starter, flour, and water to a clean container 3-4 hours before you plan to mix the dough and allow it to peak. This accounts for some left in the jar.
- While you wait for the levain to peak, add the seed mix to a small bowl, stir to combine, and set aside.
Autolyse the Dough
- In a large mixing bowl combine water and the flours.
- Allow the dough to autolyze for 30 minutes. This lets the flour properly hydrate, giving the gluten development a head start for when you begin your folds.
Add the Levain and Salt
- After 30 minutes add all of the levain to the autolyzed dough. Sprinkle the salt over the starter and mix by hand to bring it all together.
- I find that a combination of stretch and folds while squeezing the dough incorporates everything.
- Cover the seeded multigrain sourdough bread dough with a damp tea towel or a plate and allow to rest for 30 minutes.
Stretch and Folds | Strengthening the Gluten
- Do a series of stretch and folds.
- Grad the side of the dough and stretch it straight up before folding it over onto itself in the middle of the bowl. Rotate the bowl a quarter turn and repeat another stretch. Continue to stretch and fold the dough 8-12 times, or until it becomes resistant. Cover and rest for 30 minutes. This completes one set of stretch and folds.
- Continue to do a total of 4 stretch and folds with 30 minute intervals.
- On the third set of stretch and folds, add the seed mixture over the top of the dough. The stretch and folds will incorporate the seeds throughout the dough.
- Use wet hands if the dough becomes too sticky to work with.
Bulk Fermentation
- Cover the bowl with a plate or plastic wrap and let the dough rise in a warm place for 6-8 hours or until the dough is puffy, and the top is domed down where it meets the bowl.
Shape
- Turn out the dough on a lightly floured work surface using a bowl scraper.
- First, fold the bottom half of the dough up to the middle. Then fold and overlap the sides to the middle of the dough.
- Starting at the top of the dough, roll the dough into a ball.
- Using a bench knife, flip the dough ball over so that the seam is down on the work space.
- Tighten the top of the dough by cupping the dough with both hands and pulling towards you. Pivot the dough slightly and do another pull until the dough is round in shape with a smooth, tight top.
- Transfer the dough to a banneton that has been sprinkled with rice flour with the seam side up.
Final Proof
- Cover the banneton or place it in a plastic bag and refrigerate for 8-24 hours.
Bake
- The next day, preheat a Dutch oven at 450°F/232°C for one hour.
- Remove the cold dough from the refrigerator and turn out on to a piece of parchment paper.
- Using a sharp knife or bread lame, score the top of the loaf at a 45° angle.
- Brush the top of the bread lightly with water and sprinkle on the seeds.
- Lift the bread into the hot Dutch, oven using the parchment paper as handles, and bake for 30 minutes with the lid on. Remove the lid and bake for an additional 10 minutes. The bread is done when the internal temperature reaches 200°F/94°C.
Cool
- Lift the bread out onto a wire rack to cool. Wait until the bread has completely cooled before slicing to avoid a gummy texture.
Storage
- Store the bread in an airtight container for 3-4 days at room temperature. Sourdough loaves, whole or sliced, can be frozen for longer storage. Wrap securely, label with the name and date, and place in the freezer. For the best flavor, use within three months.
Notes
Nutrition information is automatically calculated, so it should only be used as an approximation.
I use a combination of one tablespoon of each of the larger seeds and one teaspoon of each of the smaller seeds. But be creative and use whatever combination you enjoy!
Nutrition
Calories: 148.9kcalCarbohydrates: 25.6gProtein: 5.4gFat: 2.9gSaturated Fat: 0.3gPolyunsaturated Fat: 1.4gMonounsaturated Fat: 0.8gTrans Fat: 0.001gSodium: 243.4mgPotassium: 74.8mgFiber: 1.7gSugar: 0.2gVitamin A: 7.2IUVitamin C: 0.05mgCalcium: 14.9mgIron: 0.9mg
Tried this recipe?Let us know how it was!
