Easy Sourdough Ciabatta Bread Recipe
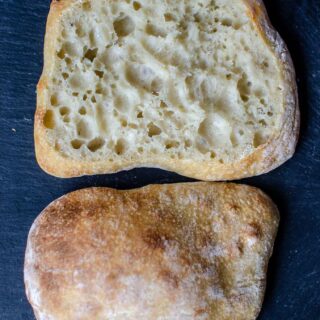
Sourdough ciabatta bread is a wonderful combination of a chewy, crisp crust with a soft inside that’s full of open, irregular holes. This beautiful artisan bread is simply delicious and perfect for dipping into oil or soup.
Want to Save This Recipe?
Enter your email & I'll send it to your inbox. Plus, get great new recipes from me every week!
By submitting this form, you consent to receive emails from Lockrem Homestead
Ingredients
- 3½ cups bread flour 450 g
- 1½ cups warm water 360 g
- 2 tsp salt 12 g
- ½ cup sourdough starter 100 g
Instructions
Feed Starter
- You will need a ripe sourdough starter for this recipe. Feed the starter 4-8 hours before mixing your dough. The starter should show plenty of signs of life, be full of air bubbles, and have risen substantially. You know the starter is ready to use when it passes the float test. To do the float test, carefully take a teaspoon of the starter, trying not to knock any air bubbles out of it, and add it to a glass of water. If it floats, it’s ready. The starter has eaten and digested enough to produce carbon dioxide, thus making the starter full of gas and light enough to float.
Autolyse
- Mix the flour and water into a large mixing bowl, making sure to incorporate all the dry flour in the bottom and sides of the bowl. Cover and allow to rest for 30 minutes. This lets the flour properly hydrate.
Mix the Dough
- Add the rest of the ingredients to the autolyze and mix well. If mixing by hand, I find that doing a combination of stretch and folds, along with squeezing the dough, makes it easier to work the other ingredients into the autolyze. Continue to mix for a minute or two until all of the ingredients are mixed well and then let the dough rest for 10 minutes. A stand mixer makes quick work of this step instead of mixing by hand. Add the autolyze, starter, and salt to a stand mixing bowl and mix on medium for 10 minutes until the dough passes the windowpane test. It will be a smooth and elastic dough and stretchy when the gluten has been properly developed. Skip the stretches and folds if using the stand mixer.
Stretches and Folds
- Once rested, it’s time to start to stretch and fold the dough if mixing by hand. This is my preferred method, but it does take more time than using a stand mixer. Grab a side of the dough and stretch it straight up 6-8 inches and then fold it over to the center of the dough. Rotate the bowl a quarter turn and do another stretch and fold. Continue stretches and folds until all of the dough has been worked and starts to become stiff. Let the dough rest for 10 minutes and do another set of stretches and folds, performing 4-5 sets or until the windowpane test is passed. The dough will gain strength and elasticity with each set of folds. Use wet hands if you find that the dough is too sticky.
Window Pane Test
- To know if the gluten is fully developed and strong enough to hold the air pockets as well as provide structure to your bread, it will pass the window pane test. The dough is gently stretched in both hands up to the light. If you can stretch the dough thin enough that you can see through it, similar to a window pane, then it's ready. If the dough breaks before being able to stretch thin enough, the gluten development isn't quite there and it needs more stretch and folds.
Bulk Fermentation
- Once the dough passes the window pane test, cover the bowl with a tea towel, plate, or plastic wrap and allow it to rest at room temperature until it has risen by 50 percent. For me, it generally takes between 4-6 hours but this time will largely depend on the temperature of your kitchen. A warmer kitchen means the bulk fermentation time will be shorter.
Cold Ferment
- Move the dough to the refrigerator and allow to cold ferment for 8-12 hours or overnight.
Divide and Shape
- The next morning turn the dough out on a floured work surface, being careful to not knock out the air pockets with the sticky side up Gently pull the dough into a rectangular shape. It doesn't need to be perfect. Remember that this is a rustic bread and that the variety of shapes just adds some charm. Dust the tops of the dough with flour. Using a bench scraper or dough knife, divide the dough into 6 equal pieces. Alternatively, you can divide the dough down the center to create two loaves.Use the bench scraper to lift the ciabatta roll onto a piece of parchment paper, making sure to leave plenty of space for each roll to rise and spread. Gently shape each roll to a rectangular shape for more even baking, but don't fret over this step too much.
Final Proof
- Cover the dough with a clean kitchen towel and rest on the counter at room temperature until you visibly see them puff up and develop a light and airy texture. This may take a bit, remember that the dough just came out of the fridge and it is cold.
Preheat Oven
- When the dough is ready, preheat the oven with a baking stone or pizza stone in it to 450 degrees for 45 minutes with a cast iron skillet on a lower rack.
Bake
- Slide the parchment paper onto the baking sheet and then slide into the oven on the pizza stone. I used a baking sheet that didn't have a raised edge, but you could use a pizza peel or a large cutting board. Quickly add water to the cast iron skillet and close the door to trap the steam. This will help the crust to form.Bake for 25 minutes or until the ciabatta rolls are golden brown and have a crisp crust.Place on a wire rack to cool completely. These are best used the day they are baked. Once cut, store in an airtight container.
Notes
Tips for making Sourdough Ciabatta
Use plenty of flour - With the hydration level in this dough so high, the highest I’ve worked with so far topping out at 82%, it makes the dough tricky to work with. It will be very sticky so you will want to generously flour your work surface, hands and the dough as you go.
It’s also a slack dough, wanting to flow and move any chance it gets. You will need to make quick, decisive motions when moving the bread. Thankfully there’s beauty in a rustic shape, and you can easily adjust the dough once it’s in its resting place.
Nutrition information is automatically calculated, so should only be used as an approximation.
Nutrition
Calories: 282.2kcalCarbohydrates: 56.9gProtein: 9.3gFat: 1.3gSaturated Fat: 0.2gPolyunsaturated Fat: 0.5gMonounsaturated Fat: 0.1gSodium: 776.9mgPotassium: 73.1mgFiber: 1.9gSugar: 0.2gVitamin A: 1.5IUCalcium: 11.4mgIron: 0.7mg
Tried this recipe?Let us know how it was!
