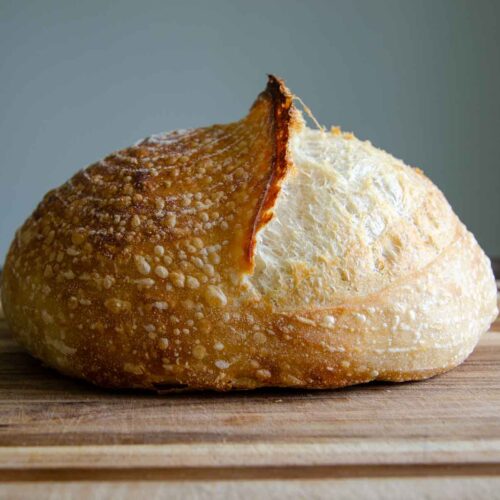
Easy Sourdough Bread Recipe
An easy sourdough bread recipe made with an active sourdough starter that produces a beautiful loaf that has a great crust, lovely, airy crumb, and delicious flavor.
Want to Save This Recipe?
Enter your email & I'll send it to your inbox. Plus, get great new recipes from me every week!
By submitting this form, you consent to receive emails from Lockrem Homestead
Equipment
- 1 large mixing bowl
- 1 Danish dough whisk
- 1 Dutch Oven
- 1 bread lame or razor
- digital scale
Ingredients
- 125 g sourdough starter ½ cup
- 325 g water 1⅓ cups
- 10 g salt 2 tsp
- 500 g bread flour 4 cups
Instructions
Feed the Starter | Mix the Levain
- This sourdough bread recipe calls for a levain mixed the night before you mix the dough at a 1:1:1 ratio.
- To mix the levain, combine equal parts active starter, warm water, and all-purpose flour in a small bowl, 42 g each. Cover and let it sit at room temperature for 8 hours.
- The levain is ready when it shows signs of activity: doubles in size, has lots of bubbles, and has a slightly sour aroma.
Autolyse
- Add 325 g (1⅓ cups) water and 500 g (4 cups) bread flour to a large bowl and mix with a Danish dough whisk until a shaggy dough forms and all of the flour is incorporated.
Mixing the Dough
- Add 10 g (2 tsp) salt into the bowl over the dough, in addition to all of the ripe levain, and mix until fully combined.
- Cover the bowl and let it rest for 30 minutes.
Stretch and Folds | Strengthening the Gluten
- Instead of kneading the dough like in traditional bread making, sourdough bread dough is strengthened with a series of stretch and folds.Grab the edge of the dough and lift it straight up before folding it over onto itself. Turn the bowl a quarter turn, and repeat, working your way around the sides of the bowl.
- Continue to stretch and fold the dough roughly 8-12 times, or until the dough becomes resistant. This completes one set of stretch and folds. Cover the bowl and rest for 30 minutes.
- Continue stretching and folding the dough for a total of 3 sets with 30 minute intervals.
- By the final set of stretch and folds, the dough will be smooth and stretchy.
Bulk Fermentation
- After the stretch and folds are completed, cover the bowl and let it rest at room temperature.
- The dough is done fermenting when the dough has risen by 50-75%, there's plenty of air bubbles beneath the surface, and the edge of the dough where it meets the bowl domes down slightly.
Shape the Dough
- Turn out the dough on a lightly floured work surface. Gently stretch the dough into a circle. With lightly dusted fingers or a bench scraper, lift the top of the dough and fold it down to the middle of the dough.
- Next, grab the bottom of the dough and fold up to the middle of the dough. Repeat for each side of the dough.
- After all 4 sides of the dough are folded over to meet in the middle, using the bench scraper, gently flip the dough over so that the seams of the dough are on the bottom. To shape the loaf into a boule, using both hands, cup the loaf on the side furthest from you.
- Gently drag the dough towards you with your hands, tuck the loaf under with the edge of your hands. Rotate the loaf a quarter turn and do the same process. The seam should continue to remain on the bottom of the loaf. This will create tension on the top of your loaf and help with oven spring, creating a taller baked loaf.
Cold Proof
- Prep the banneton by dusting it lightly with rice flour.
- Using the bench scraper, lift the dough into the banneton with the seam side up. Place the banneton into a plastic bag and refrigerate for 8- 36 hours.If you prefer to bake the sourdough right away, skip the cold proof and instead, let it proof in the banneton at room temperature. Cover the dough and let it rise for 2 -3 hours or until it's puffy and jiggly. Preheat the oven and bake as directed.
The Poke Test
- Another way to check the dough to see if it's ready to bake is using the poke test. Using a floured finger, poke into the dough about an inch. One of three things will happen:-The dough springs back all the way and fills the hole immediately. If this happens, then it needs more time to ferment.-Second, the dough springs back partially, indicating it is ready to bake.-If the dough doesn't spring back at all, it is overproofed and will not rise much when baked. All is not lost though! The bread will still have a beautiful flavor but will just be a bit more dense. You can turn over-proofed bread into delicious croutons, breadcrumbs, or flatbread. I always enjoyed freshly baked bread, regardless of how dense it was!
Score and Bake
- Preheat the Dutch oven in the middle of the oven to 450°F/232°C for 30 minutes.
- When the oven is done preheating remove the dough from the fridge. Score the top of the sourdough loaf using a lame or sharp knife at a 45° angle, 1 inch deep.
- Remove the Dutch oven from the oven and carefully lift the dough into the hot Dutch oven. Quickly replace the lid and the Dutch oven in the oven.
- Bake for 35 minutes with the lid on.
- Remove the lid and bake for an additional 10 minutes.
- Move the bread to a wire rack and let it cool completely before cutting.
Store
- Allow the bread to cool completely. Slice fresh sourdough bread and store it in an airtight container at room temperature. Best eaten within 3-4 days.
Notes
Do you have to use a levain in this recipe? No, but if you have a well-maintained and frequently refreshed starter, you can substitute 125 g ( ½ cup) of active sourdough starter for the levain in the recipe.
What if You Don't Have a Banneton? After the dough is shaped, place the dough onto a piece of parchment paper with the seam side down. Then, using the parchment paper as handles, lift the dough back into the bowl. Cover the bowl and refrigerate.
How Do You Know If the Bread Is Done? Remove the loaf from the Dutch oven and give the loaf a gentle tap on the bottom of the loaf. It will sound hollow when it's done. Another option to check if it's done is to use a digital thermometer and check the bread's internal temperature. The bread is done when it reaches 200°F/93°C.
Nutrition information is automatically calculated, so should only be used as an approximation.
This recipe has been adjusted to create a smaller loaf. Here is the original recipe:
- 150 g active sourdough starter
- 750g bread flour
- 488g water
- 15g salt
Nutrition
Calories: 119.9kcalCarbohydrates: 24.2gProtein: 3.9gFat: 0.5gSaturated Fat: 0.1gPolyunsaturated Fat: 0.2gMonounsaturated Fat: 0.04gSodium: 244mgPotassium: 31.3mgFiber: 0.8gSugar: 0.1gVitamin A: 0.6IUCalcium: 5.4mgIron: 0.3mg
Tried this recipe?Let us know how it was!
